Skip to content
For many new clothing brands, the first sample feels like the moment everything becomes real. Before that point, the product often lives in sketches, moodboards, fabric ideas, saved reference photos, and brand language. It feels clear in the founder’s mind. But once the sample stage begins, the idea has to survive contact with real fabric, real measurements, real construction, real sewing limits, and real cost. This is where many brands discover that having a strong concept is not the same as having a product that can actually be made, worn, sold, and reordered.
The first sample is not just a factory task. It is the first serious product test. It shows whether the fit makes sense, whether the fabric supports the intended look, whether the details are too complex for the price point, and whether the product has enough consistency to move toward production. For a new brand, this stage matters even more because the first few products often shape customer trust. If the fit feels wrong, if the fabric feels cheaper than expected, or if the garment changes too much after washing, the problem is no longer only technical. It becomes a brand problem.
To prepare well for a first clothing sample, a new brand should define the product clearly before contacting a manufacturer. That means deciding what the garment is, who it is for, how it should fit, what kind of fabric experience it should deliver, which details are essential, and what cost range is realistic. Clear preparation reduces revisions, shortens development time, and helps the factory make better decisions from the start.
A lot of founders assume the hardest part is finding a factory. In reality, the harder part is often learning how to communicate a product so clearly that the factory can build it well. That is why some brands move through sample development smoothly while others lose weeks in confusion. The difference is usually not luck. It is preparation. And once you understand that, your first clothing sample stops feeling like a gamble and starts becoming a system you can actually manage.
Why Your First Clothing Sample Matters

Your first clothing sample matters because it is the point where assumptions stop being ideas and start becoming cost, quality, fit, and delivery decisions. Before the sample, a product can still look correct in sketches, mockups, or reference photos. Once the sample is made, the product starts revealing the truth. The body length may feel too long. The collar may feel too loose. The fabric may not carry the shape you expected. The print may sit well visually but feel too stiff in wear. The hoodie may look good laid flat but lose structure once worn.
For a new brand, this stage matters more than many founders expect because the first sample affects much more than one garment. It affects development speed, revision cost, production planning, launch timing, pricing confidence, and later reorder stability. If the first sample is handled seriously, the brand gets clearer decisions earlier. If it is treated casually, weak decisions tend to move forward into production, where they become much more expensive to fix.
Many early-stage brands think the first sample is mainly about checking whether the product looks nice. In reality, it is doing several jobs at the same time. It is testing whether the fit makes sense. It is testing whether the material supports the intended product level. It is testing whether the construction is realistic for the target price. It is also testing whether the communication between brand and factory is strong enough to create repeatable results.
This matters because most customers do not buy a product the way a founder evaluates a moodboard. Customers judge with their body first. They notice whether the neckline sits well, whether the fabric feels worth the price, whether the hoodie holds shape, whether leggings stay in place, whether the garment still feels good after washing, and whether the second order feels like the first one. The first sample is where those customer-facing risks begin to show up.
What is a first clothing sample?
A first clothing sample is the first physical version of your design made by a manufacturer based on the information you provide. It is usually built from your sketch, tech pack, reference images, measurement notes, fabric direction, and trim details. It is not always the final product, and in most cases it should not be expected to be perfect. Its main role is to turn your product idea into something that can be measured, worn, tested, and improved.
For a new brand, the first sample is often the first moment when the product becomes fully visible. On paper, the design may feel very clear. But once the sample is made, new questions appear quickly. Is the tee too flat in shape? Does the hoodie feel too light for the target price? Is the legging supportive enough in motion? Is the sleeve proportion correct for the overall silhouette? These are exactly the questions the first sample is supposed to reveal.
It is also the first point where the quality of your product information becomes visible. If the factory had enough direction, the sample often arrives close to the intended result. If the brief was too vague, the sample may look disconnected from your original idea. That does not always mean the factory failed. It can also mean the instructions were missing key decisions.
A simple way to understand the role of the first sample is this:
| Before the Sample | After the Sample |
|---|---|
| The product exists as an idea | The product becomes something you can test physically |
| The fit is imagined | The fit can be worn and measured |
| The fabric is theoretical | The fabric can be touched, stretched, and washed |
| The quality level is assumed | The quality level becomes easier to judge |
| The cost feels flexible | The real cost logic starts becoming clearer |
That shift is important because real product development starts when the garment can no longer hide behind concept language.
Why does a first clothing sample matter so much for a new brand?
It matters because a new brand usually has less room for error. Bigger brands can sometimes absorb a delayed drop, a weak first run, or an expensive round of corrections. New brands usually cannot. They work with tighter budgets, fewer launch opportunities, and less tolerance for inventory mistakes. That means the sample stage carries a heavier business role.
A first sample affects the brand in at least five direct ways:
| Area | Why the First Sample Matters |
|---|---|
| Product quality | It reveals whether the product is actually strong enough to sell |
| Cost control | It shows where expensive problems may appear later |
| Lead time | It affects how quickly the product can move toward launch |
| Customer trust | It helps prevent obvious fit and quality issues from reaching buyers |
| Reorder potential | It shows whether the product can become a stable repeat style |
Take a simple heavyweight T-shirt as an example. On the surface, it may seem like an easy product. But the first sample still has to answer important questions. Is the collar rib strong enough? Is the body width balanced for the intended fit? Does the fabric feel substantial enough to justify the target retail price? Does the side seam stay straight after wash? Does the shirt keep a clean drape or collapse too much?
If these problems are found at sample stage, the brand may spend a few more days and another round of development. If they are found after a 300-piece or 1,000-piece order is already finished, the cost is much heavier. The brand may face returns, discount pressure, customer complaints, and weak repeat sales.
This is even more serious in categories where comfort and consistency matter deeply, such as:
- T-shirts
- hoodies
- sweatshirts
- sweatpants
- leggings
- yoga pants
- activewear
- blank essentials
In these categories, customers often buy again only if the product feels reliable. That means the first sample is not just about “Can we make this?” It is also about “Can this become a product people trust enough to repurchase?”
What does the first sample actually test?
The first sample tests more than most founders think. It is not a simple yes-or-no check. It is a layered review of whether the product works as a whole.
A strong first sample should help test the following:
| What It Tests | What You Should Learn |
|---|---|
| Fit | Whether the garment feels right on the body |
| Proportion | Whether width, length, sleeve, rise, or balance are correct |
| Fabric hand feel | Whether the product feels soft, dense, smooth, breathable, supportive, or substantial enough |
| Construction | Whether seams, finishing, and assembly feel clean and durable |
| Trim quality | Whether rib, label, print, embroidery, cord, or elastic feel aligned with the product level |
| Wash response | Whether shrinkage, twisting, recovery, or surface changes create risk |
| Commercial sense | Whether the product still works at the target price and market position |
This is why a sample should be worn, measured, photographed, compared, and if possible, washed. Looking at it once is not enough.
For example, a hoodie sample may need to answer all of these practical questions:
- Does the hood stay full, or does it collapse backward?
- Is the fleece too light for the price point?
- Do the cuffs recover well after wear?
- Is the body too long for the intended casual fit?
- Does the shoulder drop create the right shape?
- Does the logo placement feel natural in proportion to the garment?
A pair of leggings may need to answer these:
- Does the waistband stay up when walking and bending?
- Is the fabric too sheer during stretch?
- Does the seam placement feel clean against the skin?
- Is the compression level strong enough but still comfortable?
- Does the rise sit correctly for the target customer?
These are customer-use questions, not design-school questions. That is why the first sample matters so much. It pulls the product into real-life judgment.
Is the first sample mainly about appearance?
No. Appearance matters, but appearance alone is not enough. A sample can look clean in photos and still fail in real use. This is one of the biggest reasons some new brands misread sample quality. They approve what looks attractive on camera, then later discover that wear comfort, wash performance, or construction consistency are much weaker than expected.
Customers usually experience clothing in a practical order. First they feel it. Then they wear it. Then they decide whether it was worth the money. Visual style is part of that experience, but not the full experience.
A more realistic way to review the first sample is to think about what the customer will notice first.
| What the Brand Often Focuses On | What the Customer Often Notices First |
|---|---|
| Logo placement | Fabric feel |
| Visual styling | Fit comfort |
| Trend alignment | Whether the product feels worth the price |
| Product photos | Whether it washes and wears well |
| Packaging idea | Whether the second purchase feels consistent |
This is especially true for repeat-purchase products. A customer may buy a graphic tee once because the design caught attention. They buy again because the shirt feels good on the body, the neckline stays stable, the fabric does not feel weak, and the fit feels familiar when reordered.
The same is true for blank tees, logo hoodies, and lifestyle basics. In these product types, the customer is often less forgiving because the garment itself is the main value. If the hand feel feels cheap, or the proportions feel awkward, there is less design distraction to hide the weakness.
Why does the first sample have such a strong effect on later production?
Because the sample becomes the base for many later decisions. Once the fit is approved, the pattern direction becomes more fixed. Once the fabric is selected, sourcing and cost become more defined. Once the trims are chosen, the product level becomes more visible. Once the sample is accepted, the factory starts preparing for bulk production based on those decisions.
That means a weak approval at sample stage can create problems that continue all the way into production.
Here is how that usually works:
| If the Sample Stage Is Weak | What Can Happen Later |
|---|---|
| Fit was not reviewed carefully | Bulk order may have size complaints |
| Fabric was approved too quickly | Product may feel cheaper than intended |
| Wash testing was skipped | Shrinkage or twisting may appear after customer use |
| Trim quality was ignored | Product may feel inconsistent with price |
| Construction problems were overlooked | Returns and poor reviews may increase |
| Product was approved emotionally | Reorder confidence becomes weak |
This is why the sample stage should not be rushed simply because the founder wants to launch faster. In many cases, one more round of careful improvement saves much more time than launching with a weak product and trying to repair the damage later.
For new brands especially, the first few products often shape how customers describe the brand to others. If the first product feels unstable, the brand’s credibility weakens early. If it feels solid, clear, and consistent, customers begin to trust the next product more quickly.
Why is the first sample especially important for basics and activewear?
Because in basics and activewear, the product itself carries most of the value. In highly decorated fashion pieces, styling and novelty may distract from smaller technical flaws for a while. In basics and performance-led categories, customers notice product truth much faster.
For example:
- A blank heavyweight tee is judged by fit, collar, drape, and hand feel
- A hoodie is judged by comfort, fleece quality, rib recovery, and shape
- Sweatpants are judged by rise, taper, waistband comfort, and fabric feel
- Leggings are judged by support, stretch, opacity, and seam comfort
- Activewear tops are judged by hold, comfort, movement, and recovery
That means the first sample has to do more real work. It must show whether the product can hold up under everyday use, not just whether it fits a brand mood.
For brands building products in these categories, customer expectations are often very practical. They want to know:
- Will it feel good for long hours?
- Will it hold shape after washing?
- Will it feel the same when I reorder?
- Is the fabric actually worth the price?
- Does the fit match what the brand claims?
The first sample is where those answers begin.
Why does this stage matter so much for inventory risk?
Because the sample stage is the cheapest place to discover expensive mistakes.
A mistake at the first sample stage may cost:
- extra sample fee
- extra fabric development time
- one more review round
- a short delay in launch timing
The same mistake found after production may cost:
- unsold stock
- return handling
- customer service time
- discounting pressure
- damage to product reviews
- reduced reorder confidence
- more time fixing the next run
A simple comparison makes the risk easier to see:
| Stage Where Problem Is Found | Typical Business Impact |
|---|---|
| First sample | Mostly time and correction cost |
| Pre-production sample | Still manageable, but more urgent |
| After bulk production | Much higher financial and brand cost |
| After customers receive it | Cost plus reputation damage |
That is why careful sample development is often one of the smartest forms of cost control for a young brand. It may not feel like “saving money” in the moment, because it still requires time and attention. But it prevents much more painful waste later.
Why does the first sample also test the factory relationship?
Because it shows how well the manufacturer handles communication, accuracy, and problem-solving before production gets larger and more complicated.
A strong first sample process often reveals good signs such as:
- the factory asks useful questions
- unclear details are pointed out early
- fabric options are discussed realistically
- timing is explained clearly
- revision notes are understood and followed
- the factory thinks about repeatability, not just one piece
A weak process often reveals the opposite:
- details are guessed instead of confirmed
- questions are not raised until late
- the sample misses basic priorities
- communication feels reactive instead of steady
- the product path beyond the sample is unclear
For new brands, this matters a lot. A manufacturer is not only producing an item. It is becoming part of the product system. If the first sample process is disorganized, later stages are rarely easier.
This is one reason brands often value factories that can support both early development and later scale. Modaknits is built around that type of path. The company operates through 4 factories with 18 production lines, around 5,000 square meters of factory space, monthly capacity around 100,000 pieces, and a further 50,000 to 80,000 pieces of expandable output. It also supports development through 2 sample rooms, 7 pattern makers, 20 sample sewers, 3 sourcing staff, 8 sales staff, and 8 merchandisers for coordination. For a new brand, this matters because the sample is not treated as an isolated task. It can be the beginning of a longer production path.
What should a founder really learn from the first sample?
A founder should come away from the first sample with much more than a general feeling. The sample should help answer specific, business-relevant questions.
By the end of a useful first sample review, the founder should know:
- whether the product direction is commercially strong enough
- whether the fit needs small adjustments or major change
- whether the fabric supports the intended product level
- whether the trims feel aligned with the brand and price
- whether the construction can move toward production
- whether the factory understands the product clearly
- whether the style has potential for repeat orders
That is the real value of the first sample. It brings clarity.
Without that clarity, development stays vague. With that clarity, the brand can make better decisions on timing, pricing, ordering, and future growth.
In the end, the first clothing sample matters because it protects more than one product. It protects decision quality. It protects development budget. It protects launch confidence. It protects customer trust before the first customer even clicks “buy.”
For a new brand, that makes it one of the most important steps in the whole product journey.
How to Plan Your First Clothing Sample

Planning your first clothing sample is where a lot of future problems either get prevented or quietly created. Many new brands think the hard part starts when the factory begins making the sample. In reality, the harder part often comes earlier. It is the planning stage that decides whether the sample process will feel smooth and focused, or slow, expensive, and confusing.
A factory can only build from the information it receives. If the product direction is still vague, if the fit is not thought through, if the fabric idea is still changing, or if the founder has not decided what matters most, the first sample usually ends up doing too much guesswork. That often leads to extra sample rounds, more revision cost, and longer time to launch.
For a new brand, this matters because early cash flow is usually tight. Sample fees, material choices, logo development, shipping, photography, content, and first production all compete for the same budget. A poorly planned sample does not only waste time. It can also weaken pricing decisions, delay the launch window, and create uncertainty around the first order.
Good sample planning is not about creating more paperwork. It is about making enough clear product decisions before development begins. The brand should know what it is making, who it is for, how it should fit, what the fabric should feel like, what details are essential, and what price level the product must support. Once those points are clear, the factory can work much more accurately.
What should you decide before contacting a factory?
Before talking to a manufacturer, a new brand should be able to explain the product in clear, practical language. Not brand mood. Not campaign language. Real product language.
At minimum, the founder should be able to answer these questions:
- What exactly is the product?
- Who is it for?
- What should it feel like on the body?
- What should the customer notice first?
- What price level is it meant to support?
- Which details are essential?
- Which details can stay flexible in the first round?
This sounds simple, but many first-time founders cannot answer these clearly yet. They may know the visual direction, but not the actual garment logic. For example, saying “modern premium streetwear tee” is still too broad. Saying “240–280 GSM 100% cotton oversized tee with structured collar, relaxed body, slightly dropped shoulder, and clean everyday wear feel” is much more usable.
That level of clarity matters because it affects almost every technical choice that follows.
| Decision Area | What the Brand Should Know Before Contacting a Factory | Why It Matters |
|---|---|---|
| Product type | Tee, hoodie, sweatshirt, sweatpants, leggings, yoga top, activewear set | Sets the development path |
| Target customer | Men, women, unisex, creator audience, DTC basics customer, activewear user | Affects fit and material choice |
| Fit direction | Oversized, relaxed, regular, slim, compressive | Guides the pattern from the start |
| Product purpose | Daily wear, gym use, yoga, casual basics, content-led drop, repeat-purchase staple | Helps define comfort and performance needs |
| Fabric direction | Cotton, fleece, French terry, jersey, stretch knit, nylon-spandex blend | Shapes feel, drape, cost, and durability |
| Price target | Approximate retail and target product cost | Keeps design decisions commercially realistic |
| Priority points | Fit, fabric, logo treatment, speed, low MOQ, repeatability | Helps the factory know what matters most |
A brand that cannot answer these points clearly usually ends up solving them during sampling, which is slower and more expensive than solving them beforehand.
Why does product positioning matter at the planning stage?
Because the sample is not only being built as a garment. It is being built as a product for a certain customer and a certain price range. If the positioning is unclear, the sample may come back technically acceptable but commercially wrong.
For example, two T-shirts may both be well sewn, but one is built for a low-cost promotional market while the other is built for a premium daily-wear essentials brand. The difference may come from fabric weight, collar structure, shrinkage control, cut balance, finishing quality, and surface hand feel. If the founder has not defined the intended market clearly, the sample may miss the right product level even if the workmanship looks fine.
This matters even more in categories like:
- heavyweight tees
- blank tees
- logo hoodies
- casual sweatshirts
- activewear basics
- yoga pants
- leggings
- repeat-purchase knit essentials
These categories are often judged heavily on feel, stability, and wear comfort. The customer may not use technical language, but they still notice the result quickly.
A useful way to define positioning is to decide where the product sits in practical terms.
| Product Position | What It Usually Requires |
|---|---|
| Entry-level basic | Simple construction, lower fabric cost, more cost control |
| Mid-range everyday essential | Better hand feel, more reliable fit, stronger trim quality |
| Premium basic | Higher fabric standard, more stable finishing, cleaner construction, stronger repeatability |
| Performance-led activewear | Stretch control, opacity, support, seam comfort, recovery |
If the founder knows the product position early, the sample can be planned with much better judgment.
How should you choose the right first product?
A new brand does not need to launch with the most complicated garment. In many cases, the strongest first product is the one that is easiest to make clear, easiest to test, and easiest to reorder if the market responds well.
That is why many early-stage brands begin with products such as:
- 100% cotton T-shirts
- heavyweight tees
- hoodies
- sweatshirts
- sweatpants
- leggings
- simple activewear sets
- blank casual basics
These categories work well because customer response is often easy to read. Either the fit works or it does not. Either the fabric feels right or it does not. Either the customer comes back for another order or they do not. That kind of clarity is useful for a young brand.
The best first product is usually one that fits these conditions:
| Good First Product Traits | Why They Help |
|---|---|
| Clear customer need | Easier to explain and market |
| Simple enough to develop well | Fewer technical surprises |
| Strong repeat-purchase potential | Better long-term value |
| Real fit and fabric importance | Helps build product credibility |
| Can launch in smaller quantities | Reduces inventory pressure |
For example, a founder may be excited about launching with a very complex cut-and-sew fashion piece with multiple fabrics, special wash treatments, and unusual paneling. That may look impressive creatively, but it also increases the number of things that can go wrong in the first sample. A clean, strong hoodie or a solid heavyweight tee may give the brand a much better first result and a stronger base for later expansion.
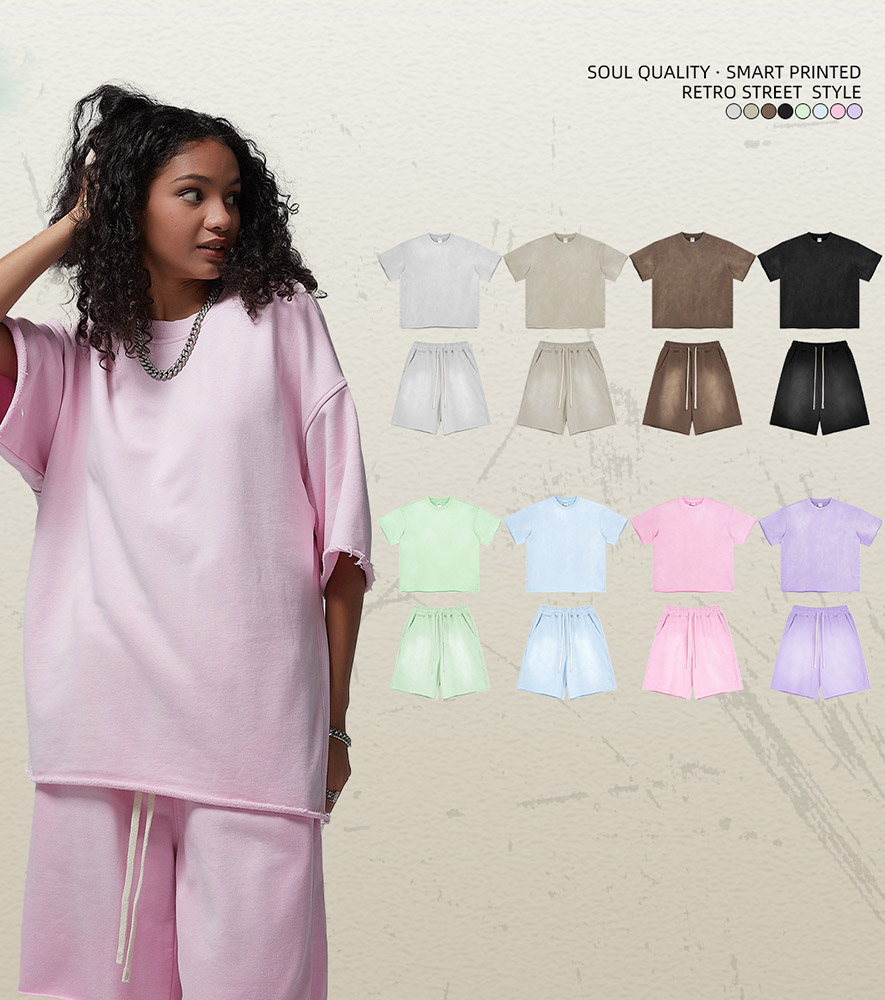
At Modaknits, this planning logic is especially relevant because the company is strongest in knit-based, repeat-friendly categories such as T-shirts, hoodies, sweatshirts, sweatpants, yoga pants, leggings, activewear, and lifestyle casual basics. These are products where strong planning creates a much smoother path from sample to reorder.
How should you define fit before the first sample?
Fit is one of the most important planning decisions because once the sample is made, many later comments will be shaped by the fit direction chosen at the start. If the fit direction is unclear, the review stage often becomes messy. The founder may say the body feels too wide one day, then later decide they actually wanted a looser look. That kind of uncertainty creates extra rounds that could have been avoided.
Before requesting the sample, the brand should define fit in practical terms.
That means deciding:
- whether the garment is oversized, relaxed, regular, slim, or compressive
- how the body length should balance with width
- whether the shoulder should sit naturally or drop
- how fitted or loose the sleeve should feel
- how much ease the customer expects
- whether the product is designed for style, movement, layering, or support
This is especially important because different product categories behave differently.
| Product Type | Fit Areas That Need Early Definition |
|---|---|
| T-shirt | Shoulder, chest width, sleeve opening, body length, collar opening |
| Hoodie | Shoulder drop, hood depth, sleeve volume, cuff tension, body ease |
| Sweatshirt | Neck opening, body balance, rib recovery, overall silhouette |
| Sweatpants | Waistband comfort, rise, thigh ease, leg taper, ankle opening |
| Leggings | Waist height, compression level, seam placement, length, opacity in stretch |
| Activewear top | Bust hold, neckline security, armhole comfort, body compression |
A very useful planning step is to choose one clear fit reference garment. Not ten. One or two strong references are usually enough. The reference should match the intended silhouette closely and should not conflict with the written measurements.
If possible, the founder should also decide what the base sample size should be. This matters because fit comments make more sense when they are built from the right base size. A unisex oversized tee may be sampled from a different base than a women’s activewear set. Starting from the wrong base can make later grading and fit evaluation harder.
How should you plan fabric before development begins?
Fabric planning is one of the biggest drivers of sample success. In many product categories, fabric is not a background choice. It is the product experience itself.
For a tee, fabric controls hand feel, drape, thickness, breathability, and perceived quality.
For a hoodie, fabric controls warmth, structure, comfort, and weight.
For leggings, fabric controls support, stretch, recovery, and confidence in wear.
For sweatpants, fabric affects comfort, silhouette, and how premium the product feels.
This is why “I want good fabric” is not enough. The founder should define fabric direction in more usable terms.
That usually includes:
- fiber content
- approximate weight
- surface feel
- stretch requirement
- firmness or drape
- wash expectation
- end use
For example:
| Fabric Planning Point | Better Way to Define It |
|---|---|
| Fiber | 100% cotton, cotton-poly blend, rayon blend, nylon-spandex, polyester-spandex |
| Weight | Light, midweight, heavyweight, or approximate GSM target |
| Surface feel | Soft, dry, smooth, brushed, structured, washed, compact |
| Stretch | No stretch, natural give, medium stretch, strong stretch and recovery |
| Use | Daily wear, loungewear, active movement, yoga, layering |
Even if the founder does not know every technical detail, they should still define the fabric intention clearly. That helps the factory source or recommend options that are much closer to the real target.
Fabric planning also affects cost quickly. A product that needs denser cotton, better rib, brushed finish, higher recovery stretch, or more stable wash behavior will usually sit at a higher cost than a simpler version. If the brand has not thought about this before sampling, the first sample may feel better than the budget allows, or cheaper than the market requires.
This is why sample planning should connect fabric to price.
| If the Product Goal Is… | Fabric Planning Should Usually Focus On… |
|---|---|
| Entry-level casual tee | Cost control, wearable comfort, basic stability |
| Premium heavyweight tee | Higher GSM, firmer hand feel, stronger collar support |
| Everyday hoodie | Softness, fleece balance, rib quality, shape retention |
| Yoga leggings | Stretch recovery, opacity, support, seam comfort |
| Lifestyle activewear | Soft performance feel, movement comfort, repeatability |
At Modaknits, current fast-return development starts especially well with 100% cotton T-shirt projects and other suitable knit items. That is useful for brands that want to start with a proven product direction instead of beginning with the most technically difficult garment.
What should go into your pre-sample planning file?
Before asking the factory to develop the sample, the brand should organize its product information into a clean working file set. This does not need to be complicated, but it does need to be complete enough to reduce misunderstanding.
A practical pre-sample file set often includes:
| File or Content | What It Should Include |
|---|---|
| Product overview | Product type, customer, use, product goal |
| Tech pack | Sketch, measurements, construction notes, trim direction |
| Reference images | Clear examples of fit, silhouette, or detail direction |
| Fabric notes | Composition, weight direction, feel goals, stretch needs |
| Logo files | AI, PDF, PNG, or other usable artwork format |
| Trim notes | Label type, print method, embroidery, cords, zippers, elastic |
| Priority note | What matters most in the first sample |
| Quantity intention | Whether the product is for sample only, small test run, or larger future order |
This is also the right place to state what should not be changed without discussion. For example, the founder may be flexible on trim sourcing but not on neckline shape. Or flexible on exact stitch method but not on body fit. The clearer these boundaries are, the easier the sample stage becomes.
How should you set priorities for the first sample?
Not every detail should carry equal weight in the first round. One of the most common planning mistakes is treating every part of the product as equally urgent. That makes it harder for the factory to know where to focus and harder for the founder to review the result clearly.
A better approach is to rank priorities before sampling begins.
For many new brands, the first sample should usually focus on:
| Priority Level | What Usually Belongs Here |
|---|---|
| Highest | Fit, fabric, silhouette, comfort |
| Medium | Core trims, collar/rib quality, logo size and placement |
| Lower in first round | Packaging, secondary labels, extra decorative details |
This ranking helps because it keeps the first sample focused on the things that shape the product most. Once the foundation is strong, other refinements become easier and cheaper to solve.
For example, if a hoodie still has the wrong body balance and weak fleece feel, it is too early to spend too much energy discussing special packaging or minor trim decoration. If a legging still needs work on opacity and waistband hold, those issues should come before secondary branding details.
How should you plan timing and budget realistically?

A lot of first-time founders create delays without meaning to because they only think about the sample lead time, not the full decision time around it. Real sample planning should include not only factory development days, but also internal preparation time, revision time, shipping time, and review time.
A more realistic planning view looks like this:
| Stage | What Needs Time |
|---|---|
| Internal planning | Product definition, tech pack, references, fabric direction |
| Sample development | Factory sample making time |
| Shipping | Sending the sample to the brand |
| Review | Measuring, wearing, documenting feedback |
| Revision round | Factory updates and second sample if needed |
| Approval | Final adjustments before production |
At Modaknits, sample development is often around 3 to 5 days, and small-batch production can move around 5 to 10 days depending on style, material readiness, and project structure. That is fast, but brands still need to plan their own side of the process carefully. If the founder takes too long to prepare files, delays approval, or changes direction after development has already started, speed at the factory alone cannot solve that.
Budget planning should also include more than just the sample fee.
The founder should think about:
- sample making cost
- fabric and trim upgrades
- logo setup cost
- shipping cost
- revision cost
- photography or content cost after approval
- first production deposit
- freight for the actual order
That broader view helps avoid a common problem where the founder spends too much on repeated sample corrections, then has less flexibility left for the first production run.
Why does planning reduce risk later?
Because every clear decision made before sampling removes guesswork from later stages.
If the fit direction is clear, revisions become smaller.
If the fabric direction is clear, sourcing becomes faster.
If the priorities are ranked, review becomes easier.
If the product role is defined, cost decisions become more realistic.
If the factory understands the intended customer, the sample is more likely to feel commercially right.
This is especially important for brands that want to grow in stages. Many brands begin with small quantities because they do not want to take heavy stock risk. That is smart. But if the product works, they also need the option to scale without rebuilding it from zero.
That is one of the practical advantages of planning with repeatability in mind from the start.
Modaknits supports development through 2 sample rooms, 7 pattern makers, 20 sample sewers, 3 sourcing staff, 8 sales staff, and 8 merchandisers coordinating projects. The company also operates through 4 factories with 18 production lines, monthly capacity around 100,000 pieces, plus another 50,000 to 80,000 pieces of expandable capacity. For a new brand, that matters because the planning stage does not need to end at one sample. It can connect to a realistic path from testing to reorder to larger production.
What should a founder be able to say before the first sample starts?
Before the first sample starts, the founder should be able to explain the product clearly in a few direct sentences.
They should know:
- what the garment is
- what customer it is for
- what kind of fit it needs
- what fabric direction supports that fit
- what details matter most
- what price level it needs to work within
- what success looks like in the first sample
That last point is important. Success in the first sample does not always mean perfection. Sometimes it means proving the fit direction. Sometimes it means confirming fabric hand feel. Sometimes it means deciding whether the product is strong enough to keep developing.
A founder who can say all of that clearly usually enters sampling with much better control.
In the end, planning your first clothing sample is not a small step before the “real work.” It is the real work. It is where the product begins to move from imagination into manufacturing logic. It is where the brand starts deciding not only what it wants to make, but what it can make well, repeat well, and sell with confidence.
For a new brand, that is one of the most valuable stages in the entire product journey.
How to Plan Your First Clothing Sample
Planning your first clothing sample is where a lot of future problems either get prevented or quietly created. Many new brands think the hard part starts when the factory begins making the sample. In reality, the harder part often comes earlier. It is the planning stage that decides whether the sample process will feel smooth and focused, or slow, expensive, and confusing.
A factory can only build from the information it receives. If the product direction is still vague, if the fit is not thought through, if the fabric idea is still changing, or if the founder has not decided what matters most, the first sample usually ends up doing too much guesswork. That often leads to extra sample rounds, more revision cost, and longer time to launch.
For a new brand, this matters because early cash flow is usually tight. Sample fees, material choices, logo development, shipping, photography, content, and first production all compete for the same budget. A poorly planned sample does not only waste time. It can also weaken pricing decisions, delay the launch window, and create uncertainty around the first order.
Good sample planning is not about creating more paperwork. It is about making enough clear product decisions before development begins. The brand should know what it is making, who it is for, how it should fit, what the fabric should feel like, what details are essential, and what price level the product must support. Once those points are clear, the factory can work much more accurately.
What should you decide before contacting a factory?
Before talking to a manufacturer, a new brand should be able to explain the product in clear, practical language. Not brand mood. Not campaign language. Real product language.
At minimum, the founder should be able to answer these questions:
- What exactly is the product?
- Who is it for?
- What should it feel like on the body?
- What should the customer notice first?
- What price level is it meant to support?
- Which details are essential?
- Which details can stay flexible in the first round?
This sounds simple, but many first-time founders cannot answer these clearly yet. They may know the visual direction, but not the actual garment logic. For example, saying “modern premium streetwear tee” is still too broad. Saying “240–280 GSM 100% cotton oversized tee with structured collar, relaxed body, slightly dropped shoulder, and clean everyday wear feel” is much more usable.
That level of clarity matters because it affects almost every technical choice that follows.
| Decision Area | What the Brand Should Know Before Contacting a Factory | Why It Matters |
|---|---|---|
| Product type | Tee, hoodie, sweatshirt, sweatpants, leggings, yoga top, activewear set | Sets the development path |
| Target customer | Men, women, unisex, creator audience, DTC basics customer, activewear user | Affects fit and material choice |
| Fit direction | Oversized, relaxed, regular, slim, compressive | Guides the pattern from the start |
| Product purpose | Daily wear, gym use, yoga, casual basics, content-led drop, repeat-purchase staple | Helps define comfort and performance needs |
| Fabric direction | Cotton, fleece, French terry, jersey, stretch knit, nylon-spandex blend | Shapes feel, drape, cost, and durability |
| Price target | Approximate retail and target product cost | Keeps design decisions commercially realistic |
| Priority points | Fit, fabric, logo treatment, speed, low MOQ, repeatability | Helps the factory know what matters most |
A brand that cannot answer these points clearly usually ends up solving them during sampling, which is slower and more expensive than solving them beforehand.
Why does product positioning matter at the planning stage?
Because the sample is not only being built as a garment. It is being built as a product for a certain customer and a certain price range. If the positioning is unclear, the sample may come back technically acceptable but commercially wrong.
For example, two T-shirts may both be well sewn, but one is built for a low-cost promotional market while the other is built for a premium daily-wear essentials brand. The difference may come from fabric weight, collar structure, shrinkage control, cut balance, finishing quality, and surface hand feel. If the founder has not defined the intended market clearly, the sample may miss the right product level even if the workmanship looks fine.
This matters even more in categories like:
- heavyweight tees
- blank tees
- logo hoodies
- casual sweatshirts
- activewear basics
- yoga pants
- leggings
- repeat-purchase knit essentials
These categories are often judged heavily on feel, stability, and wear comfort. The customer may not use technical language, but they still notice the result quickly.
A useful way to define positioning is to decide where the product sits in practical terms.
| Product Position | What It Usually Requires |
|---|---|
| Entry-level basic | Simple construction, lower fabric cost, more cost control |
| Mid-range everyday essential | Better hand feel, more reliable fit, stronger trim quality |
| Premium basic | Higher fabric standard, more stable finishing, cleaner construction, stronger repeatability |
| Performance-led activewear | Stretch control, opacity, support, seam comfort, recovery |
If the founder knows the product position early, the sample can be planned with much better judgment.
How should you choose the right first product?
A new brand does not need to launch with the most complicated garment. In many cases, the strongest first product is the one that is easiest to make clear, easiest to test, and easiest to reorder if the market responds well.
That is why many early-stage brands begin with products such as:
- 100% cotton T-shirts
- heavyweight tees
- hoodies
- sweatshirts
- sweatpants
- leggings
- simple activewear sets
- blank casual basics
These categories work well because customer response is often easy to read. Either the fit works or it does not. Either the fabric feels right or it does not. Either the customer comes back for another order or they do not. That kind of clarity is useful for a young brand.
The best first product is usually one that fits these conditions:
| Good First Product Traits | Why They Help |
|---|---|
| Clear customer need | Easier to explain and market |
| Simple enough to develop well | Fewer technical surprises |
| Strong repeat-purchase potential | Better long-term value |
| Real fit and fabric importance | Helps build product credibility |
| Can launch in smaller quantities | Reduces inventory pressure |
For example, a founder may be excited about launching with a very complex cut-and-sew fashion piece with multiple fabrics, special wash treatments, and unusual paneling. That may look impressive creatively, but it also increases the number of things that can go wrong in the first sample. A clean, strong hoodie or a solid heavyweight tee may give the brand a much better first result and a stronger base for later expansion.
At Modaknits, this planning logic is especially relevant because the company is strongest in knit-based, repeat-friendly categories such as T-shirts, hoodies, sweatshirts, sweatpants, yoga pants, leggings, activewear, and lifestyle casual basics. These are products where strong planning creates a much smoother path from sample to reorder.
How should you define fit before the first sample?
Fit is one of the most important planning decisions because once the sample is made, many later comments will be shaped by the fit direction chosen at the start. If the fit direction is unclear, the review stage often becomes messy. The founder may say the body feels too wide one day, then later decide they actually wanted a looser look. That kind of uncertainty creates extra rounds that could have been avoided.
Before requesting the sample, the brand should define fit in practical terms.
That means deciding:
- whether the garment is oversized, relaxed, regular, slim, or compressive
- how the body length should balance with width
- whether the shoulder should sit naturally or drop
- how fitted or loose the sleeve should feel
- how much ease the customer expects
- whether the product is designed for style, movement, layering, or support
This is especially important because different product categories behave differently.
| Product Type | Fit Areas That Need Early Definition |
|---|---|
| T-shirt | Shoulder, chest width, sleeve opening, body length, collar opening |
| Hoodie | Shoulder drop, hood depth, sleeve volume, cuff tension, body ease |
| Sweatshirt | Neck opening, body balance, rib recovery, overall silhouette |
| Sweatpants | Waistband comfort, rise, thigh ease, leg taper, ankle opening |
| Leggings | Waist height, compression level, seam placement, length, opacity in stretch |
| Activewear top | Bust hold, neckline security, armhole comfort, body compression |
A very useful planning step is to choose one clear fit reference garment. Not ten. One or two strong references are usually enough. The reference should match the intended silhouette closely and should not conflict with the written measurements.
If possible, the founder should also decide what the base sample size should be. This matters because fit comments make more sense when they are built from the right base size. A unisex oversized tee may be sampled from a different base than a women’s activewear set. Starting from the wrong base can make later grading and fit evaluation harder.
How should you plan fabric before development begins?
Fabric planning is one of the biggest drivers of sample success. In many product categories, fabric is not a background choice. It is the product experience itself.
For a tee, fabric controls hand feel, drape, thickness, breathability, and perceived quality.
For a hoodie, fabric controls warmth, structure, comfort, and weight.
For leggings, fabric controls support, stretch, recovery, and confidence in wear.
For sweatpants, fabric affects comfort, silhouette, and how premium the product feels.
This is why “I want good fabric” is not enough. The founder should define fabric direction in more usable terms.
That usually includes:
- fiber content
- approximate weight
- surface feel
- stretch requirement
- firmness or drape
- wash expectation
- end use
For example:
| Fabric Planning Point | Better Way to Define It |
|---|---|
| Fiber | 100% cotton, cotton-poly blend, rayon blend, nylon-spandex, polyester-spandex |
| Weight | Light, midweight, heavyweight, or approximate GSM target |
| Surface feel | Soft, dry, smooth, brushed, structured, washed, compact |
| Stretch | No stretch, natural give, medium stretch, strong stretch and recovery |
| Use | Daily wear, loungewear, active movement, yoga, layering |
Even if the founder does not know every technical detail, they should still define the fabric intention clearly. That helps the factory source or recommend options that are much closer to the real target.
Fabric planning also affects cost quickly. A product that needs denser cotton, better rib, brushed finish, higher recovery stretch, or more stable wash behavior will usually sit at a higher cost than a simpler version. If the brand has not thought about this before sampling, the first sample may feel better than the budget allows, or cheaper than the market requires.
This is why sample planning should connect fabric to price.
| If the Product Goal Is… | Fabric Planning Should Usually Focus On… |
|---|---|
| Entry-level casual tee | Cost control, wearable comfort, basic stability |
| Premium heavyweight tee | Higher GSM, firmer hand feel, stronger collar support |
| Everyday hoodie | Softness, fleece balance, rib quality, shape retention |
| Yoga leggings | Stretch recovery, opacity, support, seam comfort |
| Lifestyle activewear | Soft performance feel, movement comfort, repeatability |
At Modaknits, current fast-return development starts especially well with 100% cotton T-shirt projects and other suitable knit items. That is useful for brands that want to start with a proven product direction instead of beginning with the most technically difficult garment.
What should go into your pre-sample planning file?
Before asking the factory to develop the sample, the brand should organize its product information into a clean working file set. This does not need to be complicated, but it does need to be complete enough to reduce misunderstanding.
A practical pre-sample file set often includes:
| File or Content | What It Should Include |
|---|---|
| Product overview | Product type, customer, use, product goal |
| Tech pack | Sketch, measurements, construction notes, trim direction |
| Reference images | Clear examples of fit, silhouette, or detail direction |
| Fabric notes | Composition, weight direction, feel goals, stretch needs |
| Logo files | AI, PDF, PNG, or other usable artwork format |
| Trim notes | Label type, print method, embroidery, cords, zippers, elastic |
| Priority note | What matters most in the first sample |
| Quantity intention | Whether the product is for sample only, small test run, or larger future order |
This is also the right place to state what should not be changed without discussion. For example, the founder may be flexible on trim sourcing but not on neckline shape. Or flexible on exact stitch method but not on body fit. The clearer these boundaries are, the easier the sample stage becomes.
How should you set priorities for the first sample?
Not every detail should carry equal weight in the first round. One of the most common planning mistakes is treating every part of the product as equally urgent. That makes it harder for the factory to know where to focus and harder for the founder to review the result clearly.
A better approach is to rank priorities before sampling begins.
For many new brands, the first sample should usually focus on:
| Priority Level | What Usually Belongs Here |
|---|---|
| Highest | Fit, fabric, silhouette, comfort |
| Medium | Core trims, collar/rib quality, logo size and placement |
| Lower in first round | Packaging, secondary labels, extra decorative details |
This ranking helps because it keeps the first sample focused on the things that shape the product most. Once the foundation is strong, other refinements become easier and cheaper to solve.
For example, if a hoodie still has the wrong body balance and weak fleece feel, it is too early to spend too much energy discussing special packaging or minor trim decoration. If a legging still needs work on opacity and waistband hold, those issues should come before secondary branding details.
How should you plan timing and budget realistically?
A lot of first-time founders create delays without meaning to because they only think about the sample lead time, not the full decision time around it. Real sample planning should include not only factory development days, but also internal preparation time, revision time, shipping time, and review time.
A more realistic planning view looks like this:
| Stage | What Needs Time |
|---|---|
| Internal planning | Product definition, tech pack, references, fabric direction |
| Sample development | Factory sample making time |
| Shipping | Sending the sample to the brand |
| Review | Measuring, wearing, documenting feedback |
| Revision round | Factory updates and second sample if needed |
| Approval | Final adjustments before production |
At Modaknits, sample development is often around 3 to 5 days, and small-batch production can move around 5 to 10 days depending on style, material readiness, and project structure. That is fast, but brands still need to plan their own side of the process carefully. If the founder takes too long to prepare files, delays approval, or changes direction after development has already started, speed at the factory alone cannot solve that.
Budget planning should also include more than just the sample fee.
The founder should think about:
- sample making cost
- fabric and trim upgrades
- logo setup cost
- shipping cost
- revision cost
- photography or content cost after approval
- first production deposit
- freight for the actual order
That broader view helps avoid a common problem where the founder spends too much on repeated sample corrections, then has less flexibility left for the first production run.
Why does planning reduce risk later?
Because every clear decision made before sampling removes guesswork from later stages.
If the fit direction is clear, revisions become smaller.
If the fabric direction is clear, sourcing becomes faster.
If the priorities are ranked, review becomes easier.
If the product role is defined, cost decisions become more realistic.
If the factory understands the intended customer, the sample is more likely to feel commercially right.
This is especially important for brands that want to grow in stages. Many brands begin with small quantities because they do not want to take heavy stock risk. That is smart. But if the product works, they also need the option to scale without rebuilding it from zero.
That is one of the practical advantages of planning with repeatability in mind from the start.
Modaknits supports development through 2 sample rooms, 7 pattern makers, 20 sample sewers, 3 sourcing staff, 8 sales staff, and 8 merchandisers coordinating projects. The company also operates through 4 factories with 18 production lines, monthly capacity around 100,000 pieces, plus another 50,000 to 80,000 pieces of expandable capacity. For a new brand, that matters because the planning stage does not need to end at one sample. It can connect to a realistic path from testing to reorder to larger production.
What should a founder be able to say before the first sample starts?
Before the first sample starts, the founder should be able to explain the product clearly in a few direct sentences.
They should know:
- what the garment is
- what customer it is for
- what kind of fit it needs
- what fabric direction supports that fit
- what details matter most
- what price level it needs to work within
- what success looks like in the first sample
That last point is important. Success in the first sample does not always mean perfection. Sometimes it means proving the fit direction. Sometimes it means confirming fabric hand feel. Sometimes it means deciding whether the product is strong enough to keep developing.
A founder who can say all of that clearly usually enters sampling with much better control.
In the end, planning your first clothing sample is not a small step before the “real work.” It is the real work. It is where the product begins to move from imagination into manufacturing logic. It is where the brand starts deciding not only what it wants to make, but what it can make well, repeat well, and sell with confidence.
For a new brand, that is one of the most valuable stages in the entire product journey.
How to Request Your First Clothing Sample

Requesting your first clothing sample is not just about sending a design to a factory and waiting for a result. It is the point where your idea has to become clear enough for someone else to build it correctly. A lot of new brands lose time here, not because the factory is slow, but because the request itself leaves too much open to interpretation.
A strong sample request helps the manufacturer understand the product fast. It reduces wrong assumptions, shortens the back-and-forth, and gives the sample room a better chance of getting the first version close to your real intention. A weak request usually creates the opposite. The fit comes back off. The fabric feels wrong. The logo is placed correctly but the garment still feels cheap. The factory may have followed the files, but the files did not explain the product clearly enough.
For a new brand, this matters because the request stage affects cost, timing, and later production quality. A better request often means fewer revision rounds, less wasted shipping, faster approval, and a smoother move into the first order. A messy request often means extra sample fees, more days lost, more corrections, and more uncertainty before launch.
The first request should answer a few basic questions without forcing the factory to guess:
- What product are you making?
- Who is it for?
- How should it fit?
- What should it feel like?
- Which details matter most?
- What timing are you working toward?
- What are you flexible on, and what must stay fixed?
When those points are clear, the sample process becomes much easier to manage.
What should you send for a first clothing sample?
A first sample request should include enough information to build the product correctly, but not so much that the factory gets buried in conflicting details. Many new founders think more files automatically mean more clarity. In practice, too many mismatched references often do the opposite.
A good first request usually includes these core parts:
| Item | What to Include | Why It Matters |
|---|---|---|
| Product overview | Garment type, customer, intended use | Gives the factory immediate context |
| Tech pack | Sketch, measurements, construction notes | Creates the technical base |
| Reference images | Fit, silhouette, detail examples | Helps explain visual direction |
| Fabric notes | Composition, weight direction, surface feel | Guides sourcing and sample quality |
| Logo files | Vector or clean artwork files | Prevents logo size and placement issues |
| Trim notes | Labels, rib, zippers, cords, print, embroidery | Reduces missing details |
| Target sample size | S, M, L, or base fit size | Keeps fit development consistent |
| Timing request | Sample deadline or launch schedule | Helps factory planning |
The most important point is alignment. Your files should support the same product direction. If your tech pack shows a boxy tee, your references should not show slim-fit shirts. If your measurements indicate a cropped hoodie, your written note should not describe a long relaxed fit. Once different files point in different directions, the factory has to guess which one matters more.
A clean request package often works better than a large one. For example, three good reference images are usually more useful than twenty random screenshots saved from different brands.
A practical request package for a first hoodie might include:
- one short product description
- one tech pack
- one size measurement sheet
- two fit reference photos
- one hood shape reference
- fabric direction note
- logo artwork
- trim note for rib, label, and drawcord
That is already enough for a serious first conversation.
How detailed should your product description be?
Your product description should be short, direct, and useful. It does not need to sound impressive. It needs to help the factory understand what the garment is supposed to become.
A strong product description usually covers:
- garment type
- fit direction
- fabric feeling
- main use
- key visual or functional priorities
For example:
“Unisex oversized heavyweight T-shirt for everyday wear. The priority is a clean body shape, structured neckline, soft but substantial hand feel, and stable fit for repeat orders.”
That one description gives more real direction than broad phrases such as “quiet luxury essential” or “premium streetwear energy.” Those phrases may sound good in brand language, but they do not help the sample team decide collar construction, fabric weight, shoulder width, or overall balance.
Here is a useful comparison:
| Weak Description | Stronger Description |
|---|---|
| Modern premium tee | 100% cotton relaxed tee with structured collar and heavier hand feel |
| Elevated hoodie | Mid-to-heavy hoodie with relaxed body, full hood, and strong rib recovery |
| Yoga essential | High-waist leggings with soft compression, clean seams, and secure fit in motion |
| Minimal activewear | Smooth stretch set with support, breathability, and stable recovery |
The stronger version makes product decisions easier because it links style language to physical reality.
How many reference images should you send?
Most first sample requests work well with two to six strong reference images. Fewer than that may not give enough visual context. Too many often cause confusion.
The best references usually cover these areas:
| Reference Type | What It Helps Explain |
|---|---|
| Overall silhouette | Body shape, fit direction, length balance |
| Front detail | Neckline, placket, pocket, logo placement |
| Back view | Shape, shoulder line, seam direction |
| Close-up detail | Rib, stitching, hem finish, panel detail |
| Fabric mood | Surface texture, drape, structure |
Try to avoid sending references that solve different problems in opposite ways. For example, one image may show the sleeve shape you like, while another shows the fabric feel you want. That is fine, as long as you clearly explain what each reference is for.
A simple note helps a lot:
- Reference A for body shape
- Reference B for neckline and collar width
- Reference C for hood depth
- Reference D for fabric feel only
This kind of labeling reduces misunderstanding immediately.
Do you need a tech pack before requesting a sample?
Yes, in most cases you should have at least a basic tech pack before asking for a first sample. It does not need to be complex, but it should be usable. The tech pack is what helps the factory move from visual inspiration into actual garment construction.
A practical tech pack for a first sample usually includes:
| Tech Pack Section | What It Should Show |
|---|---|
| Flat sketch | Front and back views |
| Key measurements | Chest, body length, shoulder, sleeve, waist, hip, rise, depending on product |
| Construction notes | Seam type, hem type, neckline, pocket, waistband, panel details |
| Fabric direction | Material type, stretch need, target feel |
| Trim notes | Labels, rib, zippers, cords, artwork placement |
| Sample size | Base size for development |
| Special notes | Must-follow details or points that need attention |
For a T-shirt, even a simple tech pack should usually define:
- chest width
- body length
- shoulder width
- sleeve length
- sleeve opening
- neck opening
- collar rib height
- hem finish
For a hoodie, the pack may also need:
- hood dimensions
- rib height
- kangaroo pocket placement
- cuff opening
- drawcord details
For leggings or activewear, it should likely include:
- waistband height
- rise
- inseam
- outseam
- leg opening
- seam placement
- compression or stretch notes
Without this information, the sample room is forced to fill in too many blanks.
The measurements you share should be enough to define the garment’s fit clearly. A lot of new brands send only rough overall ideas like “oversized” or “cropped,” but those words are not enough on their own. Two oversized tees can still fit very differently. One may be wide and short. Another may be long and narrow. One may have dropped shoulders. Another may keep a more regular shoulder line.
That is why actual dimensions matter.
Below is a practical measurement guide by product type.
| Product | Core Measurements to Share |
|---|---|
| T-shirt | Chest, body length, shoulder, sleeve length, sleeve opening, neck width |
| Hoodie | Chest, body length, shoulder, sleeve length, cuff width, rib height, hood size |
| Sweatshirt | Chest, body length, shoulder, sleeve length, cuff and hem rib |
| Sweatpants | Waist, hip, rise, inseam, outseam, thigh, leg opening |
| Leggings | Waist, hip, front rise, back rise, inseam, outseam, leg opening |
| Activewear top | Bust, body length, underband, neckline, strap width, armhole |
If you already own a garment with a fit close to what you want, you can measure it and use it as a working reference. That is often helpful for first-time founders. Just make sure the reference garment is actually close to your intended result.
It also helps to mention measurement tolerance expectations later in production planning, even if the first sample stage is more flexible. This becomes especially important if the style is meant for repeat orders.
How should you describe fabric in the request?
Fabric is one of the biggest reasons a sample feels right or wrong. For many products, the factory can sew a clean garment, but if the material choice misses the intended level, the whole sample still feels off.
Your request should explain fabric in practical terms, not just emotional terms.
A useful fabric note can include:
| Fabric Point | Examples |
|---|---|
| Fiber content | 100% cotton, cotton-poly blend, rayon blend, nylon-spandex |
| Weight direction | Light, midweight, heavyweight, or target GSM range |
| Surface feel | Soft, dry, smooth, compact, brushed, washed |
| Stretch | No stretch, natural give, medium stretch, high stretch |
| Product role | Daily wear, lounge, active use, yoga, layering |
| Key requirement | Breathability, structure, support, drape, recovery |
For example, instead of saying “I want premium fabric,” it is much better to say:
- 100% cotton with heavier hand feel and good shape retention
- soft fleece with warmth but not too bulky
- nylon-spandex fabric with smooth surface, medium compression, and good recovery
- jersey fabric that feels soft for long wear but still keeps a clean silhouette
This makes it easier for the factory to suggest realistic options.
For many new brands, it is also helpful to connect fabric to customer experience. Ask yourself what the customer should feel in the first five seconds of touching or wearing the product. That answer often makes the fabric note much clearer.
How should you explain logo, print, and trim details?
Branding details often look simple, but they can create a lot of confusion if not explained well. Logo size, placement, printing method, embroidery scale, label position, and trim quality can all change how finished the product feels.
Your request should include:
- artwork file
- placement location
- size reference
- preferred method
- color information
- any must-follow visual rules
A practical trim and branding checklist looks like this:
| Detail | What to Clarify |
|---|---|
| Logo | Width/height, placement, print or embroidery |
| Main label | Woven, heat transfer, satin, cotton, position |
| Care label | Inside seam or back neck, folded or flat |
| Rib | Color match, firmness, width |
| Drawcord | Length, thickness, tip finish, color |
| Zipper | Metal or nylon, puller type, color |
| Elastic | Width, firmness, exposed or hidden |
| Screen print, heat transfer, puff print, placement |
Many first-time brands underestimate how much small trim choices affect product feel. A weak drawcord can make a solid hoodie feel cheaper. A scratchy label can reduce customer comfort. A soft rib can make an otherwise strong sweatshirt lose structure. That is why trim notes should not be treated as small afterthoughts.
What should you say about timing?
Your request should include your timing clearly, even if the date is flexible. The factory needs to know whether the sample is linked to a product launch, photo shoot, investor meeting, wholesale presentation, or simple product development.
A useful timing note might include:
- when you want the sample started
- when you hope to receive it
- whether speed or precision matters more
- whether there may be follow-up sample rounds
- whether a small run may follow quickly if the sample is approved
A simple timing structure could look like this:
| Timing Point | Example |
|---|---|
| Sample request sent | April 10 |
| Factory review and confirmation | April 11–12 |
| Sample development target | 3–5 working days |
| Shipping target | Immediately after approval of sample completion |
| Review window | 2–4 days after receipt |
| Next step | Revision or first small production order |
At Modaknits, sample lead time is often around 3 to 5 days, and small-batch production can move around 5 to 10 days depending on style, materials, and project structure. That can be especially useful for new brands that need faster testing, but only if the request is already clear enough to act on.
What questions should you ask the factory in the first request?
A strong first request is not only about what you send. It is also about what you ask. The right questions help you judge whether the factory understands your project and whether the development path is realistic.
Useful early questions include:
- Is the product brief clear enough to start sampling?
- Is the requested fabric currently available?
- Which parts of the request need more clarification?
- What sample size do you recommend starting with?
- Which details may affect cost most?
- Which details may affect lead time most?
- Are there any construction suggestions to improve quality or efficiency?
- If this product sells, can the same style be repeated consistently?
- What MOQ would apply after sample approval?
- Can the style move from small run to larger production smoothly?
These questions help the brand think beyond the sample itself.
Here is why they matter:
| Question | What It Helps You Learn |
|---|---|
| Is the brief clear enough? | Whether your files are actually usable |
| Is the fabric available? | Whether timing risk exists before development starts |
| What affects cost most? | Which decisions may push the product out of budget |
| What affects lead time most? | Where delays are most likely to happen |
| Can the style repeat well? | Whether the product can become a stable item |
| What MOQ follows approval? | Whether your first order plan is realistic |
This is especially useful for brands that want to start with smaller quantities but still need room to grow later.
How should you organize the request email?
The request email should be clean, short, and easy to scan. It should not feel like a long story. It should help the factory understand the project quickly and know what files are attached.
A strong email usually includes:
| Email Section | What to Include |
|---|---|
| Introduction | Brand name and short brand context |
| Product summary | What garment you want to develop |
| Priority points | Fit, fabric, logo, speed, low MOQ, repeatability |
| Attachments list | Tech pack, references, artwork, notes |
| Questions | Timing, fabric availability, MOQ, development advice |
| Next step | Request for quotation, sample review, or feasibility comment |
A useful structure might read like this in plain form:
We are developing a unisex oversized 100% cotton T-shirt for a daily-wear basics line.
Our main priorities are fabric feel, structured collar, and stable fit for repeat orders.
Attached are the tech pack, measurement sheet, logo artwork, and reference images.
Please let us know whether the fabric direction is available, the estimated sample timing, and any details that may need adjustment before development starts.
This kind of message is much easier for a factory to respond to than a long brand introduction without clear product direction.
What usually goes wrong at the request stage?
Most request-stage mistakes are simple, but costly.
The most common ones are:
| Common Problem | What Happens |
|---|---|
| Too little product clarity | Factory guesses key details |
| Too many conflicting files | Sample direction becomes inconsistent |
| No measurement logic | Fit comes back far from target |
| Weak fabric description | Material feels wrong in hand |
| No priority ranking | Factory does not know what matters most |
| Late logo or trim file | Sample timing gets delayed |
| Unclear next step | Brand and factory move at different speeds |
Another common mistake is trying to solve too many things in the first request. A new founder may want a very customized product with special fabric, complex embroidery, branded trims, custom packaging, and low cost all at once. That is possible in some cases, but it also increases the chance of delay and mismatch.
Often, the strongest first request focuses first on:
- fit
- fabric
- silhouette
- core branding detail
- timeline
Once those are stable, later refinements become easier.
How can a better request reduce cost and save time?
A better request reduces cost because it helps the factory get closer to the right product in fewer rounds. Every extra correction usually creates extra time, extra communication, extra sample shipping, and sometimes extra material or pattern work.
A stronger request helps save on:
| Area | How Better Requests Help |
|---|---|
| Sample rounds | Fewer avoidable revisions |
| Shipping | Less back-and-forth caused by wrong first sample direction |
| Pattern work | Better first fit base |
| Fabric sourcing time | Clearer material direction from the beginning |
| Trim rework | Fewer late branding corrections |
| Launch delays | Faster approval and production planning |
For a small brand, these savings matter. Even when one single mistake does not seem expensive on its own, several small mistakes together can slow the entire launch and reduce flexibility for the first order.
What should a founder be ready to communicate in one message?
Before sending the first request, the founder should be able to communicate the product clearly in one short message.
That message should cover:
- what the product is
- who it is for
- how it should fit
- what the fabric should feel like
- what the main priorities are
- what files are attached
- what answer is needed from the factory
If that message feels hard to write, it is usually a sign that the product still needs more planning before the request is sent.
In the end, requesting your first clothing sample is not a small administrative step. It is the point where your product has to become clear enough to build. The cleaner the request, the stronger the first sample usually becomes. And for a new brand, that can make the difference between a slow, expensive learning process and a much more controlled start.
That is why the request stage deserves real attention. It is where the factory first sees your product the way you see it. Or fails to.
How to Review Your First Clothing Sample

Reviewing your first clothing sample is one of the most important product decisions a new brand will make. This is the moment when the product stops being a concept and starts becoming something that can either move toward production or go back for correction. A lot of founders make the mistake of reviewing the sample too emotionally. They either get excited because the garment finally exists, or disappointed because it does not match the ideal version in their head. Both reactions are normal, but neither is enough on its own.
A good sample review should answer practical questions. Does the product fit the way it should? Does the fabric feel right for the target customer and price point? Does the construction look strong enough for real wear? Do the trims help the garment feel complete, or do they lower the overall impression? If the product goes into production based on this version, what problems are most likely to show up later?
For new brands, this stage matters because the sample review affects more than one piece. It affects future revision cost, launch timing, factory communication, first-order confidence, and long-term repeatability. A weak review often leads to vague feedback such as “make it better” or “make it more premium.” A strong review leads to specific decisions such as “shorten body length by 2 cm,” “increase collar firmness,” or “change to a denser fabric with better recovery.”
A sample should never be judged only by how it looks in one quick fitting. It should be reviewed in layers. First by overall impression. Then by measurement. Then by fit on body. Then by fabric feel. Then by construction. Then by trims and finishing. Then, if possible, by wash and wear response. The more carefully you review it now, the fewer expensive surprises will appear later.
What should you check first?
The first step is to check the sample with a calm, structured eye. Do not begin with tiny details. Start with the overall product shape and whether it matches the direction you intended.
Lay the garment flat on a clean surface and look at it as a whole. Check the balance between width and length. Check the shoulder line. Check whether the silhouette looks consistent with your original product direction. A hoodie meant to feel relaxed should not look narrow and long. A heavyweight tee meant to feel boxy should not fall like a standard slim-fit basic. Leggings meant for support should already look clean and stable even before they are worn.
The first broad questions should be:
- does the overall shape feel right?
- does the garment look commercially usable?
- does it fit the product level you want to sell?
- would this shape make sense to your target customer?
Only after that should you move into detail.
A simple first-pass review can be organized like this:
| Review Step | What to Check | Why It Matters |
|---|---|---|
| Overall silhouette | Width, length, proportion, body balance | Confirms whether the product is going in the right direction |
| Immediate fabric impression | Weight, surface feel, drape | Tells you whether the product level feels right |
| Construction at first glance | Clean seams, rib balance, trim alignment | Shows whether the product feels finished |
| Category match | Whether it looks right for tee, hoodie, legging, etc. | Helps avoid reviewing it with the wrong expectations |
This stage should be quick, but not careless. It gives you the first signal of whether the product has strong foundations or whether major changes are still needed.
How should you measure the sample?
After the overall check, measure the garment carefully. This is where many new brands fall short. They rely too much on visual feeling and forget that small measurement differences can change the whole product.
Use the measurement sheet or tech pack and compare the actual garment against the intended specifications. Measure the sample flat, in a consistent way, and write everything down. Do not trust memory.
For a T-shirt, useful checkpoints usually include:
- chest width
- body length
- shoulder width
- sleeve length
- sleeve opening
- neck width
- collar rib height
For a hoodie or sweatshirt, also check:
- hood opening
- hood depth
- cuff width
- hem rib height
- pocket placement
For sweatpants, leggings, or activewear, usually check:
- waistband width
- hip width
- front rise
- back rise
- inseam
- outseam
- thigh width
- leg opening
A good measurement review often looks like this:
| Measurement Point | Planned Spec | Actual Sample | Difference | Action |
|---|---|---|---|---|
| Chest width | 62 cm | 60.5 cm | -1.5 cm | Increase width slightly |
| Body length | 72 cm | 74 cm | +2 cm | Shorten body |
| Collar rib height | 2.2 cm | 2.0 cm | -0.2 cm | Review collar firmness |
| Waistband height | 8 cm | 7 cm | -1 cm | Raise waistband |
| Inseam | 68 cm | 69 cm | +1 cm | Review based on fit testing |
This kind of review matters because a garment can look almost correct at first glance and still feel wrong when worn because the measurements are drifting away from the intended fit.
For new brands, keeping a clear review table also helps later when you send corrections to the factory. Instead of saying “the tee feels a bit off,” you can say “chest is 1.5 cm smaller than target and body is 2 cm longer than planned.” That makes the next round much more productive.
How do you test fit properly?
Fit testing should happen on body, not only on the table. A flat garment review is important, but it cannot tell you everything. A product may look balanced on a surface and still feel wrong in motion or on a real body.
The first step is to test the sample on a body type close to your target customer. This is very important. A founder may personally like one fit direction, but if the brand is built for a different customer shape or use case, the sample should still be reviewed through the intended customer lens.
When testing fit, start in a neutral standing position and then move into natural motion.
Check the fit in these situations:
- standing relaxed
- raising both arms
- sitting down
- walking
- bending
- stretching
- wearing the garment for at least 10 to 20 minutes
This is especially important in categories such as:
- hoodies
- sweatpants
- leggings
- yoga pants
- activewear
- fitted tops
A short wear test often reveals problems that a mirror does not. A waistband may start rolling. A sleeve may twist. A hoodie may pull backward at the neck. A T-shirt may feel too long once tucked or layered. Leggings may become too sheer during bending. These are real customer issues, so they must be part of the review.
A practical fit review by category looks like this:
| Product Type | Fit Areas to Test |
|---|---|
| T-shirt | Shoulder, chest ease, sleeve shape, body length, collar feel |
| Hoodie | Hood balance, shoulder drop, sleeve volume, cuff hold, hem comfort |
| Sweatshirt | Neck opening, body ease, cuff recovery, overall silhouette |
| Sweatpants | Waist comfort, rise, thigh ease, taper, ankle opening |
| Leggings | Waist support, seat comfort, seam feel, opacity, stretch recovery |
| Activewear top | Bust support, armhole comfort, neckline security, movement stability |
A useful question to ask during fit testing is not just “Do I like this?” but “Would my customer want to wear this for the actual purpose it was made for?” That question usually creates better decisions.
How should you judge fabric hand feel and quality?
Fabric review is one of the biggest parts of sample evaluation because, in many categories, fabric is the product. For basics, blank apparel, and activewear, customers often judge quality through touch and wear long before they think about branding language.
Start by checking the fabric with your hands and then with wear.
Look at:
- softness
- density
- thickness
- stretch
- recovery
- drape
- surface smoothness
- warmth
- breathability
Then ask more practical questions:
- does this fabric feel right for the price point?
- does it support the intended silhouette?
- does it feel comfortable for the product’s real use?
- does it feel consistent with the brand promise?
For example, a premium heavyweight tee should usually feel different from a low-cost promotional tee. The fabric should feel more substantial, the drape more controlled, and the collar support stronger. A lifestyle hoodie should feel different from a light merch hoodie. The fleece, rib, and hand feel should match the target customer’s expectations. A yoga legging should balance softness with support. Too soft without enough recovery may look good at first but fail in wear.
A practical fabric review table can help a lot:
| Fabric Point | What to Observe | Common Risk |
|---|---|---|
| Weight | Too light, balanced, or too heavy | Product feels cheaper or less wearable than planned |
| Hand feel | Soft, dry, smooth, brushed, firm | Mismatch with target market |
| Drape | Structured or fluid | Wrong silhouette outcome |
| Stretch | Enough or not enough | Poor comfort or poor support |
| Recovery | Returns well after stretch or not | Bagging, weak fit retention |
| Surface stability | Clean or unstable | Pilling, roughness, lower quality feel |
For categories such as leggings, yoga pants, and activewear, it is useful to check opacity too. That means testing the fabric under stretch and movement, not only when standing still. A fabric that looks fine flat may become too sheer once worn.
What construction details should you review?
Construction tells you whether the garment is likely to hold up well in wear and whether it is being built in a way that can be repeated consistently in production. Even if you are not highly technical, there are many useful things you can still check.
Look at the inside and outside of the garment.
Review:
- seam straightness
- stitch consistency
- loose threads
- seam bulk
- clean finishing
- rib attachment
- label sewing
- topstitch alignment
- pocket attachment
- panel matching
For activewear and stretch products, also review seam comfort and whether the stitching feels irritating against the skin.
A useful way to review construction is to divide it into visible quality and wear quality.
| Construction Area | Visible Quality Check | Wear Quality Check |
|---|---|---|
| Side seams | Straight and even | Do not twist or pull |
| Shoulder seams | Balanced and clean | Sit comfortably on body |
| Collar seam | Clean attachment | Holds shape without discomfort |
| Cuffs and hem | Neat rib join | Recover after stretching |
| Waistband | Even and clean | Holds without rolling or cutting in |
| Flatlock or active seams | Clean appearance | Smooth against skin during movement |
These points matter because a product can look acceptable from the front and still feel weak once worn or washed. For basics and repeat-order products, customers often notice construction more through comfort and durability than through visual inspection alone.
How should you review trims and branding details?
Trims often have a bigger effect on product feel than new brands first expect. A garment with a decent fit and decent fabric can still feel weak if the rib is too soft, the drawcord looks cheap, the label scratches the neck, or the embroidery puckers the fabric.
Review trims one by one.
Check:
- logo placement
- logo size
- print quality
- embroidery tension
- rib firmness
- label comfort
- zipper feel
- drawcord thickness
- elastic strength
- hardware finish
A practical trim review looks like this:
| Trim Type | What to Check | Common Issue |
|---|---|---|
| Collar rib | Firmness, recovery, shape | Too soft, stretches out too easily |
| Woven label | Placement, sewing, comfort | Crooked or scratchy |
| Clarity, scale, adhesion | Cracking, heavy feel, wrong size | |
| Embroidery | Clean edges, stability | Puckering, stiffness |
| Drawcord | Thickness, finish, proportion | Feels too cheap for garment level |
| Elastic waistband | Strength, comfort, rebound | Rolling, weak support |
| Zipper | Smoothness, quality feel | Cheap movement, wrong finish |
For blank essentials, trims may be minimal, which makes every small choice matter more. For logo products, the branding treatment has to feel integrated into the garment, not just added on top of it.
The main question here is simple: do the trims help the product feel more complete, or do they quietly bring the product level down?
Should you wash and wear test the sample?
Yes, if possible, you should. A first sample should not only be checked in brand-new condition. Real customers will wash and wear the garment, so some of the most important product truths only appear after use.
A useful wash and wear test can show:
- shrinkage
- seam twisting
- collar distortion
- rib recovery loss
- print cracking
- embroidery puckering
- surface roughness
- pilling
- fabric stiffness change
- length change
Even one wash can reveal useful information.
A simple test structure can look like this:
| Test Type | What to Observe |
|---|---|
| First wear | Comfort, heat, pressure points, movement issues |
| After first wash | Shrinkage, twisting, hand feel change |
| After second wear | Fit retention, neckline stability, waistband or rib recovery |
This stage matters especially for cotton tees, hoodies, sweatshirts, and stretch products. A T-shirt collar that feels fine before washing may soften too much after one wash. A hoodie hem may start losing shape. Leggings may stretch out at the knee or waistband. These issues are much easier to solve before bulk production.
How should you document everything?
Documentation turns your review into something usable. Without it, even good observations can become vague later.
A useful review record should include:
- front, back, and side photos
- close-up detail photos
- flat measurement table
- fit comments
- fabric comments
- trim comments
- construction comments
- wash test comments
- priority list for corrections
You do not need a complicated internal system, but you do need a consistent one. A simple review sheet is often enough.
Here is a useful structure:
| Section | What to Record |
|---|---|
| General impression | Overall direction and first reaction |
| Measurements | Planned vs actual |
| Fit | What feels right and what feels off |
| Fabric | Hand feel, drape, stretch, recovery |
| Construction | Seams, finishing, durability concerns |
| Trims | Logo, labels, rib, zipper, cords, elastic |
| Wash/wear | Any change after use |
| Revision priority | High, medium, low |
This record becomes the base for the next conversation with the factory. It also helps prevent the common problem of sending feedback that is too general to act on.
How do you decide what matters most?
Not every issue deserves equal attention. Some problems affect the whole product. Others are smaller refinements. A good review should separate those clearly.
A useful priority structure is:
| Priority Level | What Usually Belongs Here |
|---|---|
| High | Fit problems, wrong fabric feel, major comfort issues, unstable construction |
| Medium | Trim upgrades, measurement refinements, secondary balance adjustments |
| Low | Small visual refinements, minor placement changes, non-essential add-ons |
For example, if a hoodie has the wrong body length, weak fleece feel, and soft rib, those are much more important than whether the logo should move 0.5 cm higher. If leggings become too sheer during bending, that issue should come before discussing packaging or a secondary label.
This way of reviewing protects time and budget. It keeps the next sample focused on the decisions that matter most to real customer experience.
What should you learn by the end of the review?
By the end of a strong first sample review, you should know exactly where the product stands.
You should be able to answer:
- is the overall product direction correct?
- does the fit need small changes or major changes?
- is the fabric right for the target price and customer?
- are the trims helping or hurting the product feel?
- is the construction good enough to move forward?
- what needs to change before another sample or first order?
- can this product become a stable repeat item?
That is the real purpose of the review. Not just to judge whether you like the sample, but to turn the garment into clear product decisions.
For a new brand, this stage protects much more than the sample itself. It protects your timeline, your budget, your first production order, and your customer trust. A careful review may take more time up front, but it almost always saves more time and money later.
That is why reviewing your first clothing sample should be treated as a serious business step, not just a quick visual check.
How to Improve Your First Clothing Sample

Improving your first clothing sample is where product development becomes real business work. The first sample tells you what your idea looks like in fabric and construction. The improvement stage decides whether that idea can become a product people will actually want to buy, wear again, recommend, and reorder.
A lot of new brands make one of two mistakes here. The first mistake is being too easily satisfied. They receive a sample that looks close enough, then move toward production before the product is truly stable. The second mistake is endless adjustment. They keep changing direction, adding details, and rethinking the concept every round, which increases cost and slows the project without making the product stronger. The goal is not to keep revising forever. The goal is to improve the right things in the right order.
For most brands, the strongest sample improvement process follows a practical sequence. First, identify the few issues that affect customer experience most. Second, turn those issues into clear revision instructions. Third, decide which changes are worth another sample round and which ones can wait. Fourth, make sure the revised version is not only better looking, but easier to repeat in production.
This matters because the improvement stage has a direct effect on:
| Area | How Better Sample Improvement Helps |
|---|---|
| Product quality | Solves fit, fabric, and construction problems before bulk production |
| Cost control | Reduces expensive mistakes in larger orders |
| Development speed | Keeps revisions focused instead of endless |
| Launch confidence | Helps the brand move forward with fewer doubts |
| Customer trust | Prevents obvious comfort and quality issues from reaching buyers |
| Reorder stability | Builds a more repeatable product base |
For a new brand, that makes this stage one of the most important parts of the whole development process.
How should you decide what needs improvement?
The first step is not changing things. The first step is deciding what really matters.
After reviewing the sample, brands often end up with a long list of observations. Some are important. Some are minor. Some are just personal reactions that do not truly affect the product’s performance or customer value. Improvement becomes much easier when you sort feedback into levels.
A practical way to divide issues is this:
| Priority Level | What Usually Belongs Here | Why It Comes First |
|---|---|---|
| High | Fit problems, wrong fabric feel, major comfort issues, poor recovery, unstable construction | These issues directly affect wear and customer satisfaction |
| Medium | Trim quality, neckline refinement, pocket placement, rib upgrades, logo scale adjustment | Important, but usually secondary to fit and fabric |
| Low | Minor visual tweaks, secondary branding details, small cosmetic adjustments | Helpful later, but not worth delaying core product stability |
For example, if a heavyweight tee has the wrong collar tension, body length that feels too long, and fabric that feels lighter than intended, those should come before adjusting a small chest logo by a few millimeters. If a hoodie has weak rib and a hood that collapses, solving those matters more than discussing special packaging or adding an extra inside label.
This kind of sorting helps protect time and budget. It also makes the next sample round more useful.
A good test is simple: if this issue is left unresolved, will the customer notice it quickly?
If the answer is yes, it should probably move higher on the revision list.
How do you turn sample feedback into useful revision instructions?
Many brands know what feels wrong, but struggle to explain it clearly enough for the factory to fix it. That is where improvement often slows down. The founder may say “the fit is off” or “it needs to feel more premium,” but those comments are too broad. They do not tell the factory what should actually change.
Useful revision instructions should explain:
- what the current issue is
- where it appears
- what should change
- how important the change is
A strong revision note usually sounds more like this:
- body length feels too long for intended boxy fit, shorten by 2 cm
- collar rib feels too soft after wear, use firmer rib or adjust collar construction
- waistband rolls during movement, increase waistband height and support
- hoodie hood lacks volume, deepen hood shape slightly
- fabric feels too thin for target price level, review denser option
This makes the next step much easier.
A practical revision chart can help:
| Area | Current Issue | Requested Change | Priority |
|---|---|---|---|
| T-shirt body | Length too long | Shorten body by 2 cm | High |
| Collar | Rib too soft | Use firmer rib | High |
| Hoodie hood | Hood collapses | Increase hood depth | High |
| Legging waistband | Rolls during bending | Raise waistband and improve support | High |
| Logo | Slightly low placement | Raise logo by 1 cm | Medium |
| Care label | Placement feels bulky | Adjust sewing position | Low |
The best feedback is specific enough that the factory can act on it without having to guess what you mean.
What should you improve first: fit, fabric, or trims?
In most cases, fit should come first, then fabric, then construction and trims. This order works because it follows how customers actually experience the garment.
Customers usually notice:
- whether it fits well
- whether it feels right
- whether it looks and holds up like a quality product
That means the most important sample improvements usually involve:
- body balance
- width and length proportion
- neckline feel
- shoulder position
- sleeve shape
- waistband comfort
- rise
- stretch support
- fabric weight
- fabric softness or structure
- recovery after wear
- seam comfort
- rib quality
Only after these feel more stable should you spend too much time on smaller visual details.
Here is a practical order of improvement:
| Improvement Order | Focus | Reason |
|---|---|---|
| 1 | Fit and comfort | Most important for actual wear |
| 2 | Fabric feel and performance | Strongly affects perceived value |
| 3 | Construction durability | Important for repeat wear and production stability |
| 4 | Core trims and branding | Important, but should support a stable product |
| 5 | Small cosmetic details | Best handled once the foundation is right |
For example, if leggings still need work on support, opacity, and seam comfort, it is too early to spend a lot of energy on secondary logo options. If a hoodie still has weak rib and poor sleeve balance, those should be fixed before discussing custom packaging details.
How many sample rounds do most new brands need?
There is no single number that fits every product, but many new brands need more than one sample before a style is truly ready. That is normal. The question is not whether another sample round is needed. The better question is whether the next round has a clear purpose.
A typical development path may look like this:
| Sample Round | Main Goal |
|---|---|
| First sample | Check overall direction, fit logic, fabric level, and construction base |
| Second sample | Correct major fit, fabric, and comfort issues |
| Third sample if needed | Refine details and confirm production readiness |
A simpler product with clear planning may move faster. A more technical garment, such as leggings, yoga pants, or a custom hoodie with multiple details, may need more refinement.
The warning sign is not the number of rounds. The warning sign is when each new round creates a whole new set of basic questions because the product direction is still changing. That usually means the brand has not decided what it really wants yet.
A healthier revision process looks like this:
| Healthy Progress Sign | What It Means |
|---|---|
| Fewer major problems each round | The product direction is becoming more stable |
| Feedback becomes more precise | The garment is closer to approval |
| Changes are getting smaller | Main issues are being solved |
| Factory response improves | Communication is getting clearer |
| Cost surprises reduce | Product logic is becoming more realistic |
For most new brands, the second sample is often where the biggest quality improvement happens. The first sample reveals the truth. The second sample shows whether the brand and factory can solve the right problems together.
How should you improve fit without creating confusion?
Fit improvement becomes messy when brands revise the silhouette itself instead of refining it. That usually happens when the founder has not fully decided what the intended fit should be.
For example, if a brand says it wants an oversized tee, but then reacts negatively every time the shirt feels roomy, the factory cannot improve the product clearly because the target keeps moving. The same problem appears when a brand says it wants supportive leggings, but then rejects the feel of compression every round.
That is why fit improvement should begin with a fixed fit intention.
Once that fit intention is clear, you can refine the sample through measured changes.
A useful fit-improvement method is:
- keep the overall fit direction fixed
- identify exact points that need adjustment
- change only what affects the fit problem directly
- avoid changing several fit variables at once unless necessary
For example:
| Fit Problem | More Useful Adjustment |
|---|---|
| Tee feels too long | Shorten body length only |
| Hoodie feels too narrow in body | Increase chest width without changing sleeve shape first |
| Sweatpants feel bulky at ankle | Reduce leg opening slightly |
| Leggings roll at waist | Increase waistband height or support instead of changing full body shape |
This approach makes it easier to understand which changes are actually solving the problem.
Fit improvement also works better when the sample is tested in movement, not just standing still. A hoodie may feel fine while standing and then feel restrictive when reaching forward. Leggings may look smooth in the mirror and then become unstable in motion. These observations should guide the revision, not just static appearance.
How should you improve fabric and material choices?
Fabric improvements often create some of the biggest gains in product quality. In many categories, customers feel fabric quality before they notice anything else. That is especially true for:
- T-shirts
- hoodies
- sweatshirts
- sweatpants
- leggings
- yoga pants
- activewear
- blank basics
If the product feels lighter, rougher, stiffer, less supportive, or less stable than expected, that usually needs attention before production.
A useful way to improve fabric is to decide exactly what is missing.
| Fabric Problem | What It Usually Means |
|---|---|
| Too thin | Product may feel cheap or lack structure |
| Too stiff | Product may feel uncomfortable or unnatural |
| Too soft with weak recovery | Garment may lose shape in wear |
| Too warm | Product may not suit daily use |
| Too sheer in stretch | Performance or confidence problem |
| Weak surface stability | Higher risk of pilling or poor wash result |
Once the actual issue is clear, the brand can ask for more useful changes. Instead of saying “better fabric,” the revision can say:
- move to a denser cotton with stronger hand feel
- keep softness but improve shape retention
- increase fabric recovery for active use
- reduce transparency in stretch
- improve rib firmness to better support neckline
This gives the factory much better direction.
It is also smart to connect fabric changes to price reality. A better fabric often changes the cost. That does not mean it should be avoided. It means the brand needs to know whether the improvement supports the product’s retail goal.
How should you improve construction and durability?
Construction improvements are often less visible than fit or fabric changes, but they matter a lot for comfort, repeat wear, and long-term customer trust. Even a garment that looks good in photos can feel weak if the construction is not solid enough.
Common construction improvements include:
- cleaner seam finishing
- better stitch consistency
- stronger topstitch alignment
- smoother seam feel in activewear
- improved rib attachment
- better waistband construction
- better label sewing position
- reduced seam twisting risk
A useful construction review for revision planning can look like this:
| Construction Area | Problem | Improvement Direction |
|---|---|---|
| Collar seam | Feels uneven | Improve seam balance and rib attachment |
| Side seams | Twisting after wash | Review sewing method or fabric stability |
| Waistband | Rolls during movement | Strengthen waistband construction |
| Cuffs | Lose shape after wear | Upgrade rib quality or attachment |
| Inner seam | Feels rough on skin | Improve seam comfort or finishing |
For products meant for daily wear or repeat purchase, these improvements matter a lot. A customer may not describe the seam construction in technical language, but they still notice when a garment feels uncomfortable, loses shape, or looks worn too quickly.
How should you improve trims and branding details?
Trims should improve the overall product feel, not just decorate it. This means the branding details need to feel consistent with the garment quality.
Useful trim improvements may include:
- firmer collar rib
- softer and better-placed label
- cleaner print finish
- better embroidery backing
- thicker drawcord
- more premium zipper feel
- stronger elastic
- improved logo scale and placement
A practical trim revision table looks like this:
| Trim | Current Issue | Improvement Direction |
|---|---|---|
| Collar rib | Too soft | Use stronger rib with better recovery |
| Woven label | Scratchy | Change material or placement |
| Embroidery | Puckers fabric | Adjust backing or stitch density |
| Feels too thick | Review print method | |
| Drawcord | Feels light | Use thicker cord with cleaner finish |
| Elastic | Weak hold | Increase firmness or width |
These changes can make a product feel much more complete without changing the main design.
When should you stop revising and move forward?
This is one of the hardest decisions for a new brand. The right answer is usually not “when everything is perfect.” It is closer to “when the important things are stable enough to produce with confidence.”
A sample is usually close to ready when:
| Sign | What It Suggests |
|---|---|
| Fit direction is now clear and approved | Customers are likely to receive the intended silhouette |
| Fabric supports the target price level | Product feels commercially right |
| Major comfort issues are solved | Wear experience is strong enough |
| Construction feels repeatable | Bulk production risk is lower |
| Remaining changes are small | The product no longer needs major rebuilding |
If the remaining comments are mostly small adjustments, the product may be ready to move closer to production. If the main issues still involve fit, fabric, support, comfort, or stability, it is usually too early.
A helpful question is this: if this exact version were produced in real quantity, would the main customer complaints already be predictable?
If the answer is yes, more correction is probably needed.
How can you improve the sample without wasting time and money?
The best way is to stay disciplined.
That means:
- do not change the whole concept every round
- do not treat every issue as equally urgent
- do not delay review for too long
- do not give vague feedback
- do not add new design complexity late unless it clearly improves the product
- do focus on customer-facing issues first
- do keep revision notes measurable
- do make sure the factory understands what matters most
A strong sample-improvement process often saves money by reducing:
| Cost Risk | How Better Improvement Helps |
|---|---|
| Too many sample rounds | Keeps corrections focused |
| Extra shipping | Reduces avoidable back-and-forth |
| Late design changes | Prevents rework |
| Weak first production | Lowers risk of dead stock and returns |
| Inconsistent repeat orders | Builds a more stable product base |
For new brands, this discipline is especially valuable because every extra round affects cash flow, launch timing, and first-order confidence.
Why does this stage matter so much for later growth?
Because the improved sample becomes the base for everything that comes next. Once the fit, fabric, and construction are improved properly, the style becomes easier to reorder, easier to scale, and easier to trust.
This matters even more for products meant for repeat purchase, such as:
- blank tees
- heavyweight tees
- logo hoodies
- sweatshirts
- sweatpants
- leggings
- yoga basics
- activewear essentials
A product that has been improved carefully is more likely to hold consistency from a small test order into a larger run. That protects customer trust and makes future production less stressful.
Modaknits is especially useful in this kind of path because it can support both the early improvement stage and later production growth. With 2 sample rooms, 7 pattern makers, 20 sample sewers, 3 sourcing staff, 8 sales staff, and 8 merchandisers coordinating development, the company has the structure to help brands refine products before scaling. It also works through 4 factories and 18 production lines, with monthly capacity around 100,000 pieces and another 50,000 to 80,000 pieces of expandable output. For a new brand, that means the sample does not need to be improved in isolation. It can be improved with future production in mind.
What should a founder know after the improvement stage?
By the end of this stage, the founder should know more than whether the sample looks better. They should know:
- whether the fit is now commercially right
- whether the fabric supports the intended product level
- whether the construction feels reliable enough
- whether the trims match the quality level
- whether another sample round is still necessary
- whether the style can move toward production without major risk
- whether the product can become a stable repeat item
That is the real purpose of improving the first sample. It is not just to fix mistakes. It is to turn the garment into a product that is clearer, stronger, and more ready for the market.
For a new brand, this stage is where product confidence is built. Not through hope, but through revision, testing, and clearer decisions. Once that happens, moving from sample to first order becomes much more realistic.
How to Avoid First Clothing Sample Mistakes

Avoiding first clothing sample mistakes is not about trying to make the process perfect. It is about removing the kinds of errors that waste time, raise cost, delay launch, and weaken confidence in the product before it ever reaches a customer. Most first-sample problems do not come from one dramatic failure. They come from small avoidable issues that build on top of each other. A missing measurement here. A vague fabric note there. A fit decision that was never fully made. A review comment that sounds clear in the founder’s head but means something different to the factory.
For a new brand, these mistakes matter more because the margin for error is smaller. Sample fees, revisions, shipping, content production, and first-order deposits all sit close together in the early budget. When the sample process gets messy, the cost is not only the price of another correction. It is also the cost of lost time, launch delays, slower cash flow, and lower confidence when the brand should be moving toward its first order.
A first clothing sample usually goes wrong for one of four reasons:
| Main Cause | What It Usually Looks Like | What It Leads To |
|---|---|---|
| Weak planning | Product direction is not clear enough | Wrong first sample, more revisions |
| Weak communication | Files conflict or key notes are missing | Factory guesses important details |
| Weak review | Feedback is too vague or too emotional | Slow and low-value corrections |
| Weak approval discipline | Product is approved too early | Problems move into bulk production |
The good news is that most of these mistakes can be reduced if the brand treats the first sample as a product-development step, not just a factory task. The goal is not to remove all friction. The goal is to make sure each round of work produces clearer decisions instead of more confusion.
What are the most common first sample mistakes?
Most first sample mistakes are surprisingly basic. They do not usually happen because a founder lacks creativity. They happen because the product was not made clear enough before development started.
The most common mistakes include:
- unclear product positioning
- weak fit definition
- unrealistic fabric expectations
- too many conflicting references
- incomplete tech pack
- poor priority setting
- reviewing the sample too quickly
- changing direction after sampling starts
- approving based on excitement instead of stability
A simple breakdown looks like this:
| Common Mistake | What Happens in Practice |
|---|---|
| Product is too vaguely defined | Factory makes something technically correct but commercially wrong |
| Fit direction is unclear | Sample feels off, but no one agrees why |
| Fabric note is too broad | Garment feels cheaper, thinner, stiffer, or less supportive than intended |
| Too many reference images | Sample mixes different directions and feels inconsistent |
| Tech pack misses key points | Important details like neckline, rise, or rib get guessed |
| Too many priorities at once | Factory does not know what to solve first |
| Review is unstructured | Feedback becomes broad and hard to act on |
| Brand changes core ideas too late | Extra rounds, higher cost, slower progress |
| Approval happens too early | Problems move directly into first production |
For example, a founder may send ten images of T-shirts they like, but those images may show different collar widths, different body lengths, different fabric weights, and different shoulder shapes. The factory then has to choose what seems most important. That creates risk before the sample is even cut.
The same thing happens with hoodies, leggings, and sweatpants. A founder may say they want a product that feels “premium,” but that word alone does not explain whether the fabric should be denser, softer, more supportive, more structured, or more compact. When those points stay undefined, the sample usually misses the real goal.
Why do so many first sample mistakes start before the sample is made?
Because most sample problems are really decision problems. The sample only reveals them.
Before the first sample, many brands are still working with a concept, not a fully decided product. They may know the mood, the customer image, the launch story, and even the marketing angle. But they may not yet know the exact fit, fabric level, construction logic, or cost boundary. Once the factory starts development, those missing decisions become visible.
This is why first-sample mistakes often begin with one of these planning gaps:
| Planning Gap | What It Causes Later |
|---|---|
| No clear end customer | Fit and product level become inconsistent |
| No defined price range | Fabric and trim choices become unrealistic |
| No fixed fit direction | Review stage becomes confusing |
| No clear fabric target | Sourcing and sample quality become unstable |
| No priority ranking | Too many issues compete at once |
| No success criteria | Brand does not know what to approve or reject |
A useful way to pressure-test readiness before sampling starts is to ask:
- What exactly is this garment?
- Who is it for?
- What should it feel like?
- What must not go wrong?
- What matters more: speed, fit, fabric, or visual detail?
- What would make this first sample “good enough” to move into revision instead of full redesign?
If those questions cannot be answered clearly, the first sample often becomes a way of discovering what should have been decided earlier.
Why is poor fit planning one of the biggest mistakes?
Because fit problems affect almost everything else. If the fit direction is unclear, the sample may be judged unfairly, revised inefficiently, or pushed into production with the wrong silhouette.
Many new brands use words like oversized, relaxed, regular, fitted, supportive, or compressive without translating them into measurements and proportion decisions. But those words can mean very different things in actual product development.
For example, an oversized T-shirt can still vary widely in:
- shoulder width
- chest width
- body length
- sleeve opening
- collar opening
- drop balance
A relaxed hoodie can still feel completely different depending on:
- hood depth
- body length
- rib tension
- sleeve fullness
- cuff opening
A legging can still change a lot depending on:
- rise
- waistband height
- compression level
- seam placement
- leg opening
- stretch recovery
That is why weak fit planning creates so many later mistakes.
| Fit Planning Problem | What It Often Causes |
|---|---|
| Founder wants oversized but keeps reacting against width | Endless silhouette confusion |
| No fit reference garment used | Factory builds from rough interpretation |
| Body length not defined well | Product feels awkward even if width is close |
| Sample size base not chosen properly | Later grading and fit review become unstable |
| Movement not considered | Product looks okay standing still but fails in wear |
This matters because fit is one of the first things customers feel. If the fit is wrong, even strong fabric and clean branding may not save the product.
Why do fabric mistakes cost so much later?
Because fabric affects both quality and perception. A garment can be sewn cleanly and still fail if the fabric feels wrong for the target customer or the target price point.
A common first-sample mistake is describing fabric too vaguely. Words like premium, soft, luxury, athletic, or elevated are not enough on their own. They do not explain whether the product needs:
- more structure
- more softness
- more stretch
- more recovery
- more thickness
- more breathability
- better opacity
- stronger surface stability
When the fabric note is weak, the sample may come back with material that is technically usable but commercially wrong.
| Fabric Mistake | What Usually Happens |
|---|---|
| Fabric goal is too vague | Sample feels off in hand even if shape is acceptable |
| Weight is not discussed | Tee feels too light or hoodie feels too bulky |
| Stretch need is unclear | Activewear lacks support or becomes uncomfortable |
| Recovery is ignored | Product bags out or loses shape in wear |
| Wash behavior is not considered | Shrinkage, twisting, or surface change show up later |
For basics and activewear, this matters even more because customers often judge the product first by feel. A blank tee, a logo hoodie, or a pair of leggings does not have much room to hide weak material choices. If the fabric feels cheap, unstable, or uncomfortable, the customer notices quickly.
That is why one of the safest ways to avoid first-sample mistakes is to define fabric through product experience, not just through marketing words.
Why do too many references often make the sample worse?
Because more references do not always create more clarity. Sometimes they create more contradiction.
A founder may think they are being helpful by sending fifteen screenshots, six Pinterest images, three photos of competitor products, and a few quick notes in chat. But if those references point in different directions, the sample room is left trying to combine ideas that do not fully belong together.
For example:
- one T-shirt reference may show the sleeve you like
- one may show the fabric feel
- one may show the collar shape
- one may show the body length
- one may show a totally different product category by mistake
Without clear labels, the factory may assume all of those references are meant to work together.
A better approach is to use fewer references and assign each one a purpose.
| Better Reference Use | Why It Works Better |
|---|---|
| 1–2 images for silhouette | Keeps fit direction clearer |
| 1 image for collar or hood detail | Isolates the detail you care about |
| 1 image for fabric mood | Helps define feel without confusing fit |
| Short written notes for each image | Reduces guesswork |
This is one of the easiest mistakes to avoid, and one of the most useful improvements a brand can make early.
Why do brands lose time by trying to solve too much in the first sample?
Because not every detail should be solved at once. A first sample should usually focus on the foundation of the product: fit, fabric, comfort, and main construction. Many new brands overload the first round with too many goals at the same time.
They may want:
- final fit
- final fabric
- final print
- final embroidery
- final labels
- final packaging
- low cost
- fast lead time
- low MOQ
- perfect photo-ready result
That is too much pressure for one early sample round, especially for a new product.
A better approach is to rank priorities.
| Priority Level | What Usually Belongs Here |
|---|---|
| Highest | Fit, body balance, comfort, fabric direction |
| Medium | Core trims, rib quality, logo placement, print scale |
| Lower in first round | Packaging, secondary labels, extra decorative finishes |
This kind of ranking helps the factory know what success looks like in the first round. It also helps the founder review the sample with more discipline.
Trying to solve everything at once often creates a product that feels busy but still unstable.
Why is vague feedback one of the most expensive mistakes?
Because vague feedback causes vague corrections.
Once the first sample arrives, many brands send notes like:
- make it better
- make it more premium
- fit is not right
- fabric feels a bit off
- logo should look stronger
Those comments may be emotionally true, but they do not tell the factory what should change in physical terms.
A much more useful revision note sounds like this:
- shorten body length by 2 cm
- increase chest width by 1.5 cm
- use firmer collar rib
- move logo up by 1 cm
- review denser fabric option with better hand feel
- increase waistband height and support
- reduce sleeve opening slightly
The difference is huge.
| Feedback Style | Result |
|---|---|
| Broad and emotional | Factory has to interpret what you mean |
| Specific and measurable | Factory can revise with much more accuracy |
Vague feedback usually costs more because it leads to extra rounds, repeated misunderstandings, and slower product improvement. Clear feedback tends to reduce shipping waste, revision time, and frustration on both sides.
Why is approving too early such a serious mistake?
Because once a weak sample is approved, its problems often move directly into the first production run. That means issues that were still manageable at sample stage become much more expensive to solve later.
Approving too early often happens when:
- the founder is excited and wants to move fast
- the sample “looks close enough”
- the launch timeline feels urgent
- the cost of another sample round feels frustrating
- the founder is tired of revising
These feelings are understandable, but they are not strong enough reasons to approve a product that still has clear fit, fabric, or comfort issues.
A sample is usually not ready for approval if:
- body balance still feels wrong
- fabric still feels under the target level
- waistband or rib performance is weak
- trim choices still lower the product feel
- wash behavior is unknown on an important product
- the brand still cannot explain what exactly has been approved
A simple approval filter helps:
| Approval Question | If the Answer Is No |
|---|---|
| Does the fit match the intended customer? | More correction is needed |
| Does the fabric support the target price? | Review material again |
| Does the product feel strong enough to sell? | Do not move too fast |
| Can this exact version be repeated confidently? | Product is not stable yet |
| Are remaining issues only minor? | Major revision is still needed |
For new brands, early approval can feel like saving time. In reality, it often only moves the same problems into a more expensive stage.
Why do late design changes create so much damage?
Because every major late change forces earlier work to lose value.
If the brand changes core direction after the first sample has already revealed the product clearly, the next round may not be a revision anymore. It becomes a new product direction hiding inside the same project. That creates:
- extra pattern work
- extra sourcing work
- more sample cost
- longer lead time
- less clarity
- weaker decision history
Late changes usually happen when the founder is still discovering the product while the factory is already trying to develop it. Some discovery is normal. But large concept shifts late in the process are costly.
Examples of risky late changes include:
- switching from regular fit to oversized after the first round
- changing from lightweight to heavyweight fabric after trim decisions were already made
- adding major embroidery or special wash details late
- changing the product’s target customer during revision
- turning a daily basic into a more fashion-driven silhouette mid-process
A better habit is to lock the main concept before sampling starts, then use the sample to refine that direction, not replace it.
How can a new brand reduce first-sample mistakes in a practical way?
The most reliable way is to build a repeatable working method. Not a complicated system. Just a disciplined one.
A strong first-sample process often includes:
| Step | What It Helps Prevent |
|---|---|
| Clear product brief | Prevents vague direction |
| Simple but usable tech pack | Prevents missing key specs |
| Limited, labeled references | Prevents mixed signals |
| Clear fabric note | Prevents wrong material feel |
| Priority ranking | Prevents overloaded first round |
| Structured review table | Prevents weak feedback |
| Measurable revision notes | Prevents guesswork in corrections |
| Approval checklist | Prevents emotional early approval |
For many brands, this alone removes a large share of avoidable mistakes.
Another practical way to reduce mistakes is to choose the right kind of first product. Products with clear fit logic and strong repeat value often give newer brands a better starting point. That is one reason categories such as 100% cotton T-shirts, heavyweight tees, hoodies, sweatshirts, sweatpants, leggings, yoga pants, and activewear basics are often smart early products. They are still demanding, but they are easier to test clearly than more complex, fashion-heavy styles with too many construction variables.
How do the right factory and process reduce mistakes?
A capable factory cannot replace unclear thinking from the brand, but it can reduce risk when the process is handled well. The right manufacturer often helps by:
- asking useful questions early
- pointing out missing details
- giving practical fabric suggestions
- flagging cost or lead-time risks
- supporting revision accuracy
- thinking about repeatability, not just one sample
This matters because first-sample mistakes are not only technical. They are often communication problems. A better factory relationship tends to reduce silent assumptions.
For example, Modaknits supports product development through 2 sample rooms, 7 pattern makers, 20 sample sewers, 3 sourcing staff, 8 sales staff, and 8 merchandisers for follow-up. It also operates through 4 factories, 18 production lines, around 5,000 square meters of factory space, monthly capacity around 100,000 pieces, and another 50,000 to 80,000 pieces of expandable output. For new brands, that kind of structure matters because the sample is not handled as a one-off piece only. It can be developed with later scaling, repeat orders, and production stability in mind.
That is especially useful for brands building:
- blank tees
- logo hoodies
- casual basics
- small-batch knit products
- activewear lines
- repeat-order essentials
In those categories, avoiding early sample mistakes matters even more because product consistency is part of the brand value.
What should a founder remember most?
The biggest thing to remember is that most first-sample mistakes are preventable when the brand is clear about what it is making and disciplined about how it communicates.
A founder does not need to know everything before the first sample. But they do need to know enough to guide the product properly.
Before development starts, the founder should know:
- what the garment is
- who it is for
- how it should fit
- what the fabric should feel like
- what matters most
- what can stay flexible
- what would make the sample strong enough to move forward
Once the sample arrives, the founder should be ready to:
- measure it
- wear it
- test it
- document it
- prioritize problems
- communicate changes clearly
- avoid approving too early
That is how mistakes get reduced.
In the end, avoiding first clothing sample mistakes is not about being overly cautious. It is about protecting the product before it becomes expensive inventory. It is about protecting the launch before it turns into delay. It is about protecting the customer experience before the customer even sees the product.
For a new brand, that makes this stage one of the smartest places to be strict.
Conclusion
Your first clothing sample is not just the first version of a garment. It is the first real test of how your brand makes product decisions. It shows whether your fit direction is clear, whether your fabric choice supports the price and customer expectation, whether your construction is strong enough for real use, and whether your product can move from idea to repeatable production without losing control.
For a new brand, this stage deserves more attention than most founders expect. A well-planned sample can save weeks of revision, reduce avoidable costs, and build a much stronger path toward your first order. A poorly handled sample can create delays, confusion, weak approvals, and inventory risk that follows the product long after launch.
That is why the smartest approach is not to chase speed alone or to chase perfection endlessly. It is to build clarity. Be clear about what you are making. Be clear about who it is for. Be clear about how it should fit, feel, and perform. Then work with a manufacturer that can support both early testing and later growth.
If you are developing T-shirts, hoodies, sweatshirts, sweatpants, leggings, yoga pants, activewear, or other knit essentials, Modaknits can help you move from first sample to production with a more stable and practical process. If you are ready to develop your next style, request a quotation from Modaknits and start turning your product idea into something real, wearable, and ready for the market.