Skip to content
Got a pile of basic crew neck tees that just don’t feel right anymore? Instead of tossing them out, why not turn them into sleek, stylish V-necks? It’s easier than you think—and the results look store-bought when done right.
To sew a V-neck from a crew neck T-shirt, mark the desired depth, remove the original collar, cut the new shape, and finish the edges using ribbing, bias tape, or a clean raw hem.
I’ve done this countless times to upgrade boring basics into modern essentials—and it always feels like a fresh win. Here’s how to do it, step by step.
Why Transform a Crew Neck into a V-Neck?
Sometimes it’s about updating your look. Sometimes it’s about better fit. And sometimes, it’s about keeping your favorite tee alive.
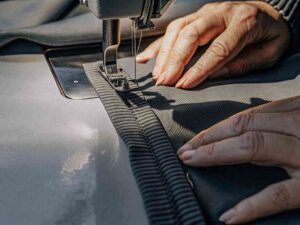 Precision Ribbing Stitch Work
Style and Fit Benefits
- V-necks elongate the neck1 and create a slimmer upper silhouette
- They feel less restrictive than crew necks
- Adds a more relaxed, modern edge to your basics
Sustainable Fashion Tip
- Don’t toss old shirts—revamp them!
- This DIY keeps your wardrobe fresh and reduces textile waste
What You’ll Need
| Tool/Material | Purpose |
|---|---|
| Sharp fabric scissors | Clean, precise neckline cutting |
| Tailor’s chalk/marker | Mark your V-neck outline |
| Measuring tape/ruler | Ensure symmetry |
| Pins or clips | Hold fabric in place during sewing |
| Seam ripper (optional) | Remove original collar carefully |
| Sewing machine or needle & thread | For finishing the new neckline |
| Bias tape or original collar | For edge finishing options |
| Iron & ironing board | Press seams for a professional look |
Step-by-Step Guide: How to Cut and Sew a V-Neck from a Crew Neck
Ready to turn that tee into a custom-fit V-neck? Let’s go.
Step 1 – Mark the New Neckline
- Put on the shirt and use a mirror to mark the center of your desired “V” depth
- Remove the shirt, then draw a symmetrical V shape from the shoulder seam to the center mark using chalk
- Check both sides are even
Step 2 – Remove the Existing Crew Neck Collar
- Use a seam ripper2 to carefully detach the ribbed collar
- Take your time—avoid tearing the body fabric

Step 3 – Cut the New V-Neck Shape
- Fold the shirt in half vertically, matching shoulder seams
- Cut along your chalk lines so both sides stay symmetrical
- Make sure your “V” isn’t too deep unless you’re sure!
Step 4 – Finish the Edges
Choose your finish based on your style and sewing skill level.
Option A: Reuse Original Ribbing
- Cut the ribbing in two angled pieces
- Pin and sew them along the V-neck with slight stretch
- Match the “V” point carefully—clip a notch if needed for clean corners
Option B: Add Bias Tape Facing
- Pin bias tape, right sides together, along the neckline
- Sew around, then fold the tape inward and topstitch to secure
- Clean, polished finish ideal for more formal tees
Option C: Create a Raw-Edge Look
- Stretch the edge lightly to encourage a slight roll
- Use a narrow zigzag stitch to prevent fraying
- Skip stitching altogether for a grungy, street-style effect
Bonus Tips for a Clean V-Neckline
- Clip a tiny notch at the “V” point before sewing to prevent puckering
- Press seams with an iron for a flat, professional-looking finish
- Use a stretch stitch or zigzag for jersey/knit fabrics to retain flexibility
Final Styling Ideas
You’ve made the cut—now show it off with the right outfit.
Dress It Up
- Pair your new V-neck with a structured blazer, black denim, or a minimal chain
- Clean, urban, and confident

Keep It Casual
- Wear it loose with joggers, cargo pants, or distressed jeans
- Great for lounging or laid-back outings
Conclusion
Turning a crew neck into a V-neck doesn’t require a fashion degree—just a little precision and some style vision. With this guide, you can update your basics, extend your wardrobe life, and express your personal look with confidence.
Would you like a printable pattern for marking a perfect V-shape every time? I can create one to help you streamline your next DIY session!